The Big One
In some ways I really enjoy writing these long ones – I get to really dive into a subject, I absolutely learn how to do something, and in theory I am imparting valuable information to you, Gentle Reader.
On the other hand, this sort of thing takes time. Lots of time. There’s stuff I have to learn (I’m not calling this the Compleat Idiot’s Guide for nothing), dreaming up use cases, actually performing the example, and then writing it all up.
All of the above is an excuse for not getting something out quicker. OMG this took a while what with paid work (I am trying to reverse my normal “never let paid work get in the way of unpaid work”), in theory having a life, and oh yeah preparing for my Kscope16 sessions. Whoops, right back to my work-before-and-after-work.
Regardless of my seemingly non-stop whining over this, for your reading pleasure below I’ve tried to compare and contrast what it’s like to do a common Planning administrative task of monthly Actual loads in to a forecast scenario in both PBCS and on-premises 11.1.2.4 Planning in an automated fashion.
To do that, I must:
- Load new metadata
- Refresh the Planning application
- Clear out existing Actual data just in case there’s anything there. No, there shouldn’t be but one never knows if there’ll be more than one pass.
- Load data.
- Aggregate the database
Happily, most of this is very similar (so what’s my excuse for not getting this out weeks ago?) to on-premises Planning so the only thing we will have to really consider how data gets loaded via the concept of inboxes.
Splitting things into two and more
I’m going to write this series in two major and many minor parts.
The two main themes:
- What are the user interface methods of doing this? There are a lot of steps here and a few surprises along the way.
- How do I automate this in both environments? What seems to be a bit of a disappointment in the first part turns out to be worth it in the second.
^^^See how I tease or at least hope I tease you into sticking around for both major themes? I try.
As there is so much to show , I am going to split that into many posts. Why do that? Mostly because there are so many, many, many steps that I want – and I think in the SI world you need – to show in excruciating detail. I for real and for true took 99 screenshots of this process to illustrate how to do things and I simply can’t put all of that into one post or even two.
Before you dive any further, know that this post is long, like really long, like OMG how long is it? Long. I did that for two reasons: to show you exactly how it’s done and to drive home again and again how different and frankly clickicious (just made that one up) the Simplified Interface can be. Different is another word for mind-bogglingly click happy. You’ll see.
What’s the use case?
Simply the export of metadata into both on-premises Planning and PBCS. For those of us Compleat Idiots (I mostly refer to myself in this regard), the on-premises bit is old hat but as we delve into PBCS you’ll see that isn’t the case at all.
One other really important bit
Every act I take in PBCS in this post is for the most part with a few exceptions, just about the same as on-premises when PBCS’ Workspace mode is used.
Where there are differences I will point them out but there is generally administrative parity between on-premises Workspace and PBCS’ Workspace.
The Simplified Interface (SI) will differ quite a bit as we shall see.
I want doesn’t get
Wouldn’t it be nice if PBCS supported EAS? Wouldn’t it? It doesn’t.
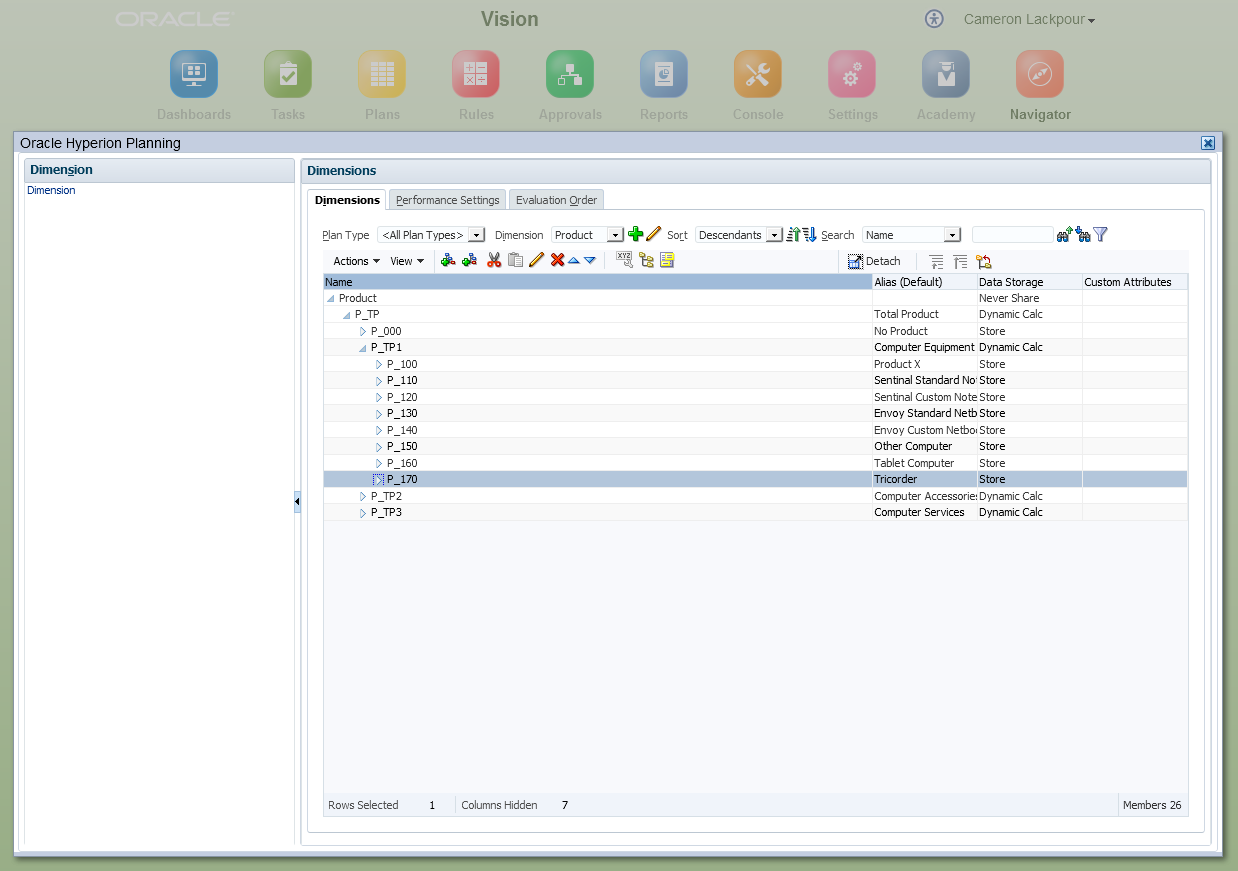
But as I’ve gone and converted PBCS’ Vision application to on-premises, I now have quasi-PBCS-enabled-Vision on my local VM and once there I can view the Plan Types in Essbase form, just as Bob Earle decreed. ←Technically, he didn’t write EAS, but he did write AppMan, and if he were still in this space he’d be an advocate of real outline editors. Or not ‘cos he likey really does have a life.
Let’s take a look at the Product dimension. Lots of lovely computers, but no Tricorders? My Inner Spock rebels at the thought.
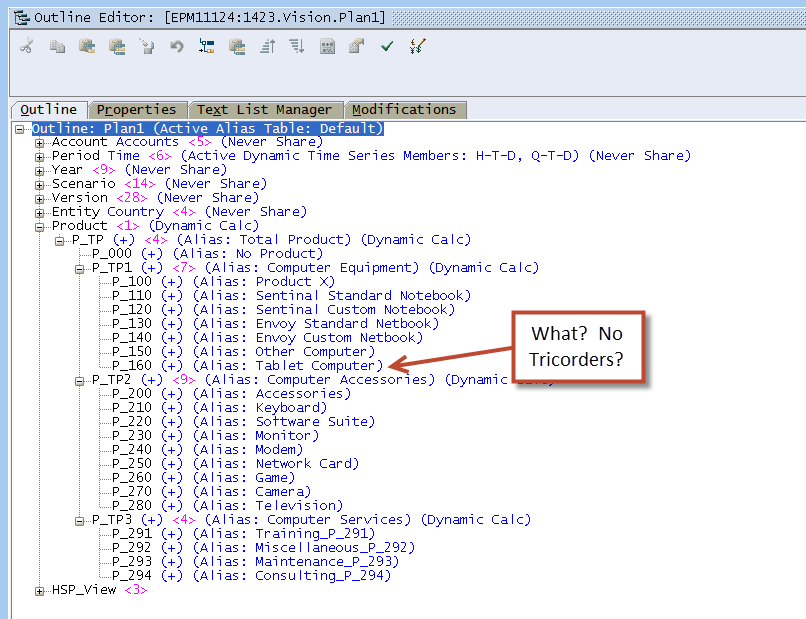
Is that the case in PBCS? It’s the same but that should be no surprise as I’ve not touched this dimension.
Export it out
I can never remember the format of outlineload.cmd (or in this case, Planning’s UI) metadata file format. Rather than try to tough it out or – gasp – RTM, I will instead take the lazy geek’s way out and export the metadata from Planning itself. I can then modify it and be on my merry way.
Workspace
On-premises
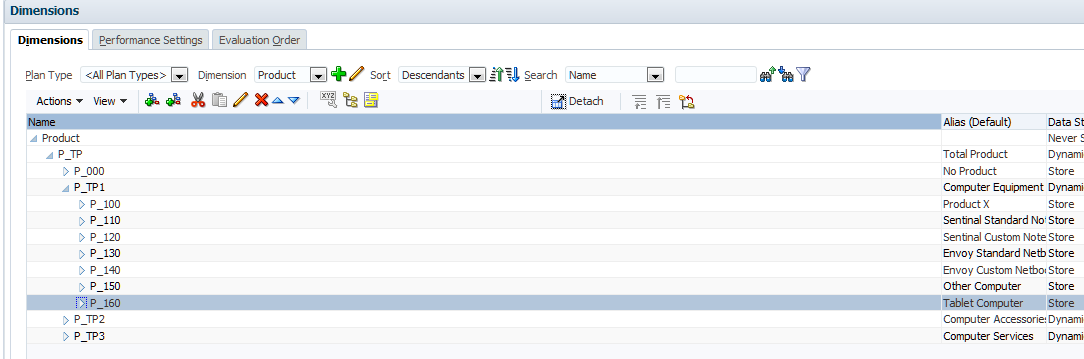
I’ll export the dimension through Administration=>Import and Export->Export Metadata to File

Pick the Product dimension:

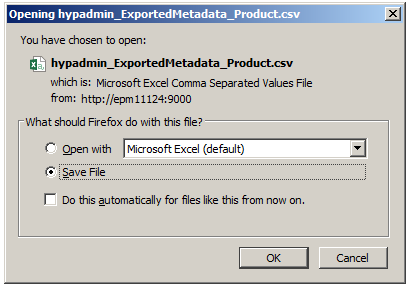
Save the file as a .csv file:
Once saved, the text file is as follows:
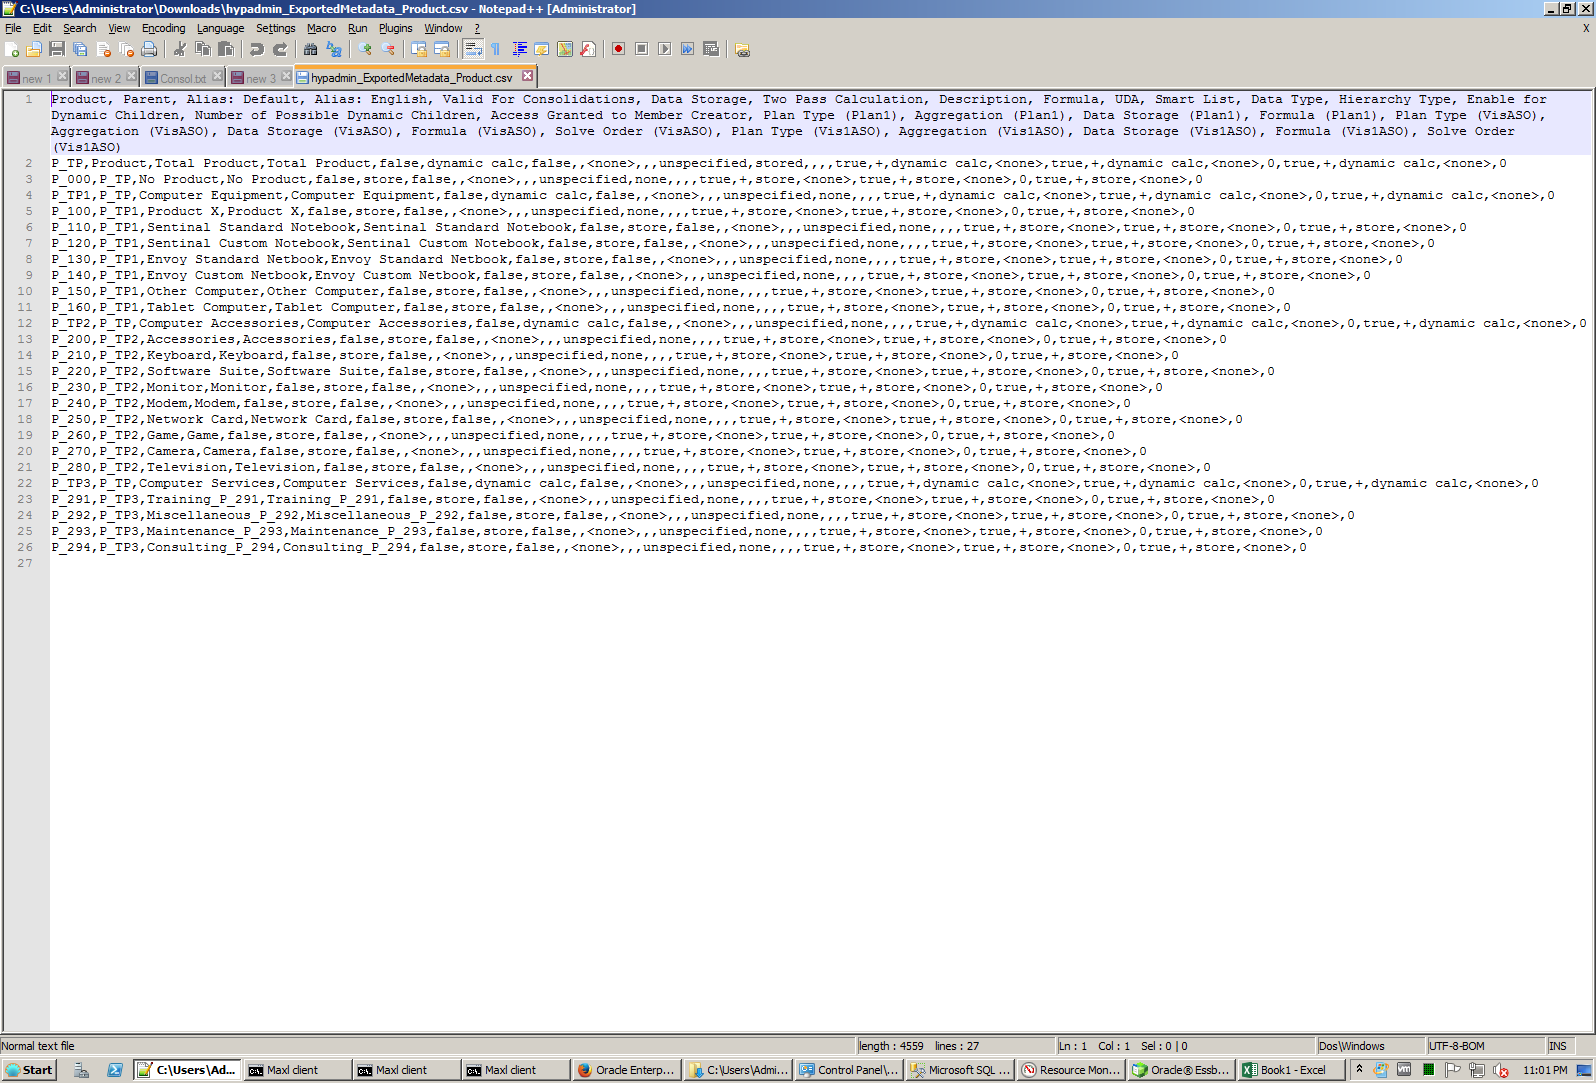
Not easy to read but all there.
PBCS
Workspace
It’s the same. That’s it. I told you there was parity on most administrative functions.
Simplified Interface
SI is quite a bit different, and there are two ways to do this.
- Through local files
- Via a PBCS
Local files are easier but are one-offs whereas PBCS jobs can be automated. Let’s examine the local approach first.
All news is local
Having selected the most awesome Candy Crush (I stole that description from He Who Shall Remain Nameless) SI Console and then click on the Export button:

And then click on the dimension I want to export (Product) and then the Export button itself:

Note that, unlike Workspace, I can define what delimiters I want to use. In on-premises and PBCS Workspace, it’s comma or nothing.
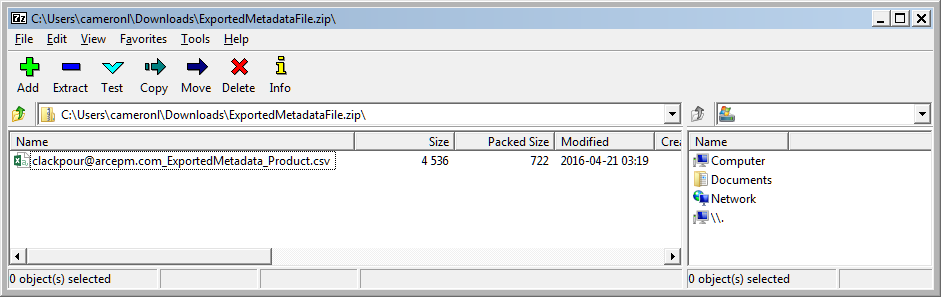
The result is the same export dimension metadata except it now comes across as a .zip file:
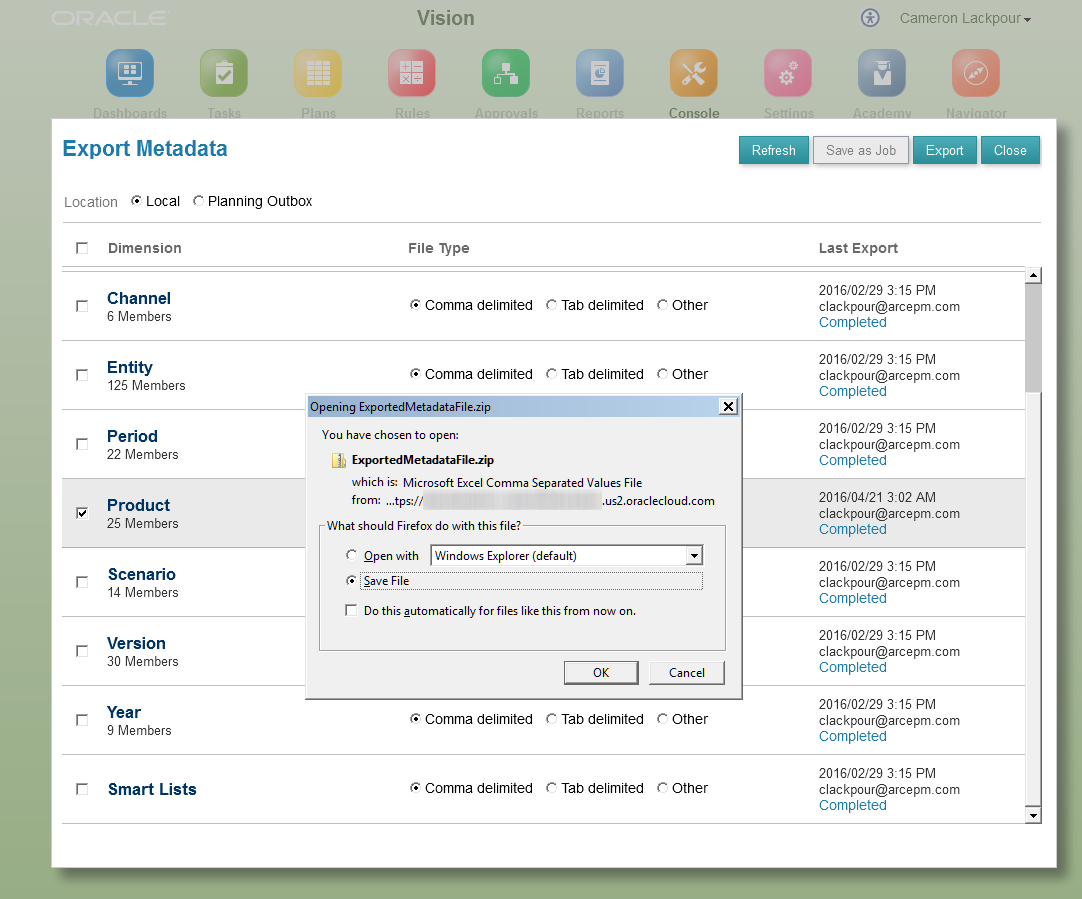
Why bother making it zipped? Part of that has to do with moving files across an inter- rather than intra-net connections. The other, rather more interesting part is that it is possible to export more than one or indeed all of the dimensions at the same time and even export them as a mix of comma and tab and who knows what else delimited outputs. Choice is good.
In any case, here it is as a single dimension zip file:
Get a job
The local approach works but it’s strictly manual just like the Workspace approach is. I can hear you say, “But Cameron, all actions in the User Interface are manual. That’s the quintessence of something done in any kind of GUI. Duh.” And Yr. Most Humbl. & Obt. Svt. agrees; that’s why this next, rather more convoluted Job approach is worth the pain.
Here’s my take on a Job (and I imagine there are better descriptions out there but this is what’s worked for me): a PBCS Job is an administration process definition.
Setting the job itself up is a complete PITA and unfortunately not something we’ll see the benefit of till the next installment (or two or three or whatever down the line) but trust me on this, it’s eventually worthwhile.
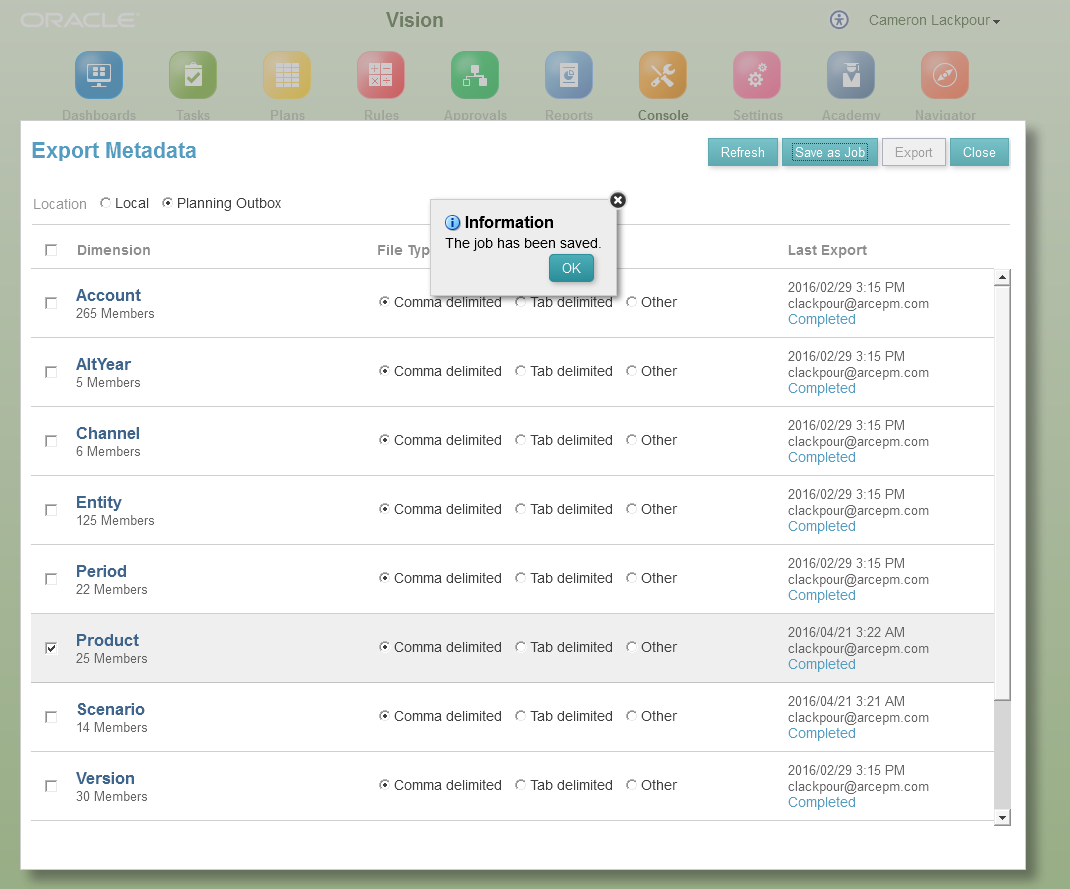
Using the same use case, I’ll select the Product dimension and then click on the “Save as Job” button:
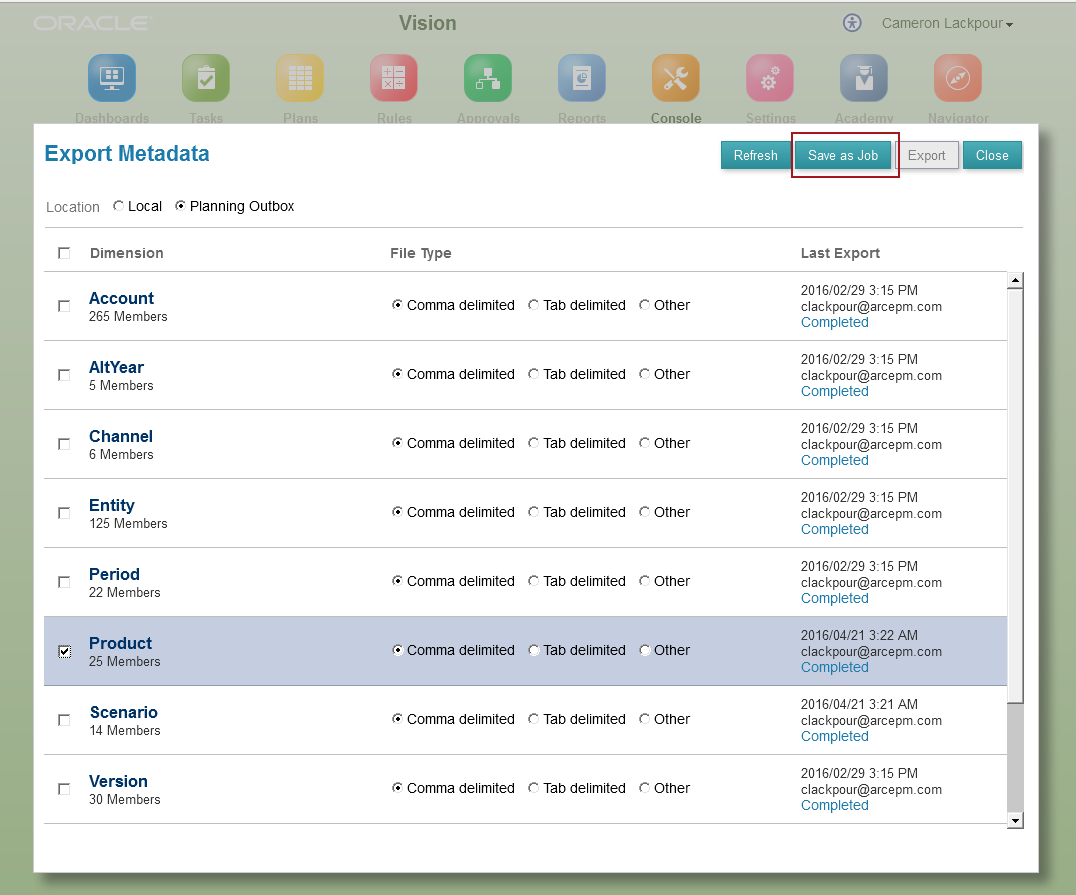
I’ll name the job (you can’t see it from this screenshot but it’s called ExportProduct):

Ta da, a job to export metadata has been created:
How does one run a job? It’s a defined administrative task which is just dandy, but there’s no point to a process that can’t be done.
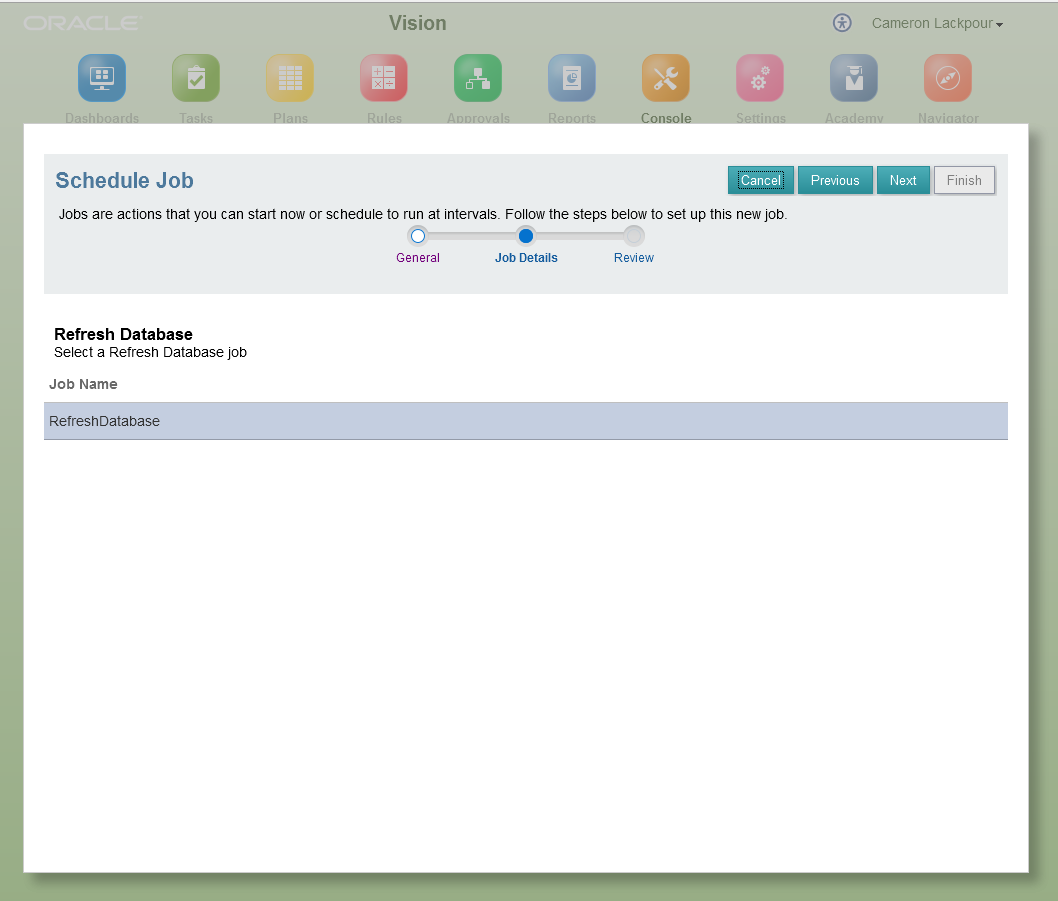
The way to run a job is to navigate to the calendar-ish (there’s a hint there) Job tab and then click on “Schedule Job”.

Remember that comment about calendars? That’s one of the nice things about a job – it can be scheduled and a variety of tasks can be scheduled including the Export Metadata task that we need.

Don’t miss the ability to schedule tasks. This illustration doesn’t take advantage of that but know that this is something completely alien to on-premises Planning which relies on OS schedulers.
For the time being, let’s just run the job right now:
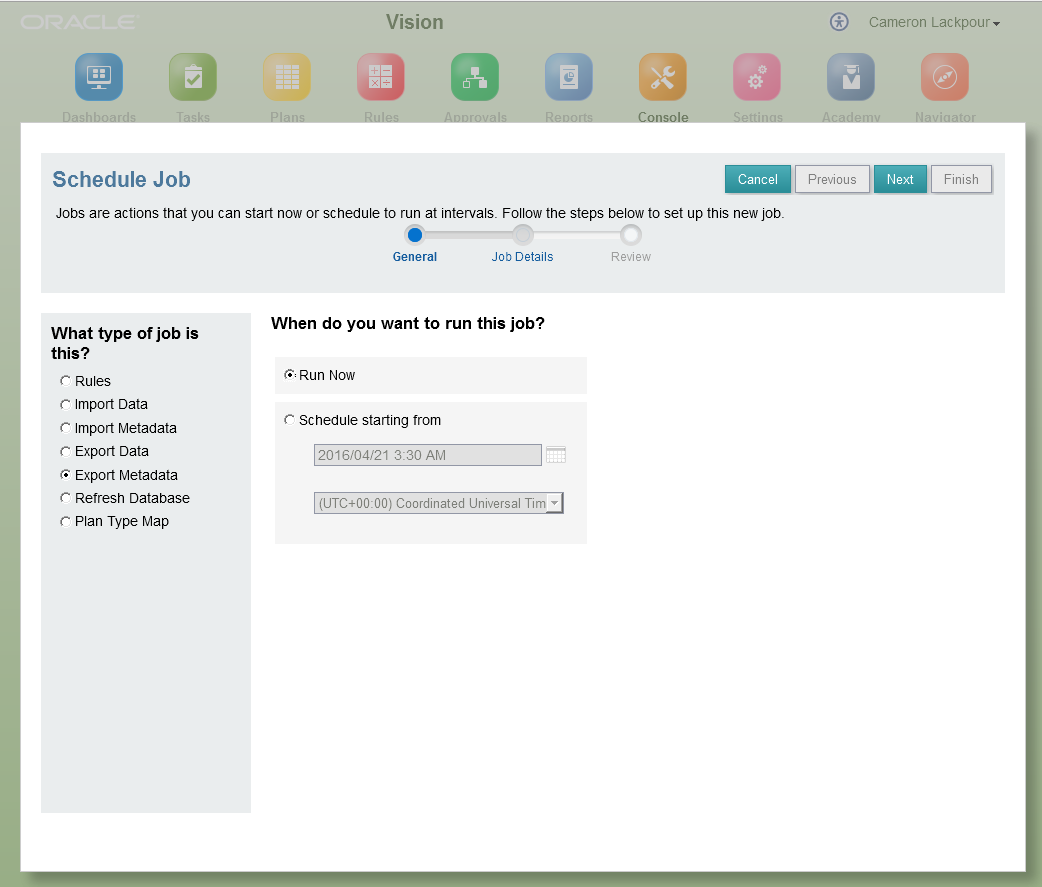
And walk our way through the wizard:

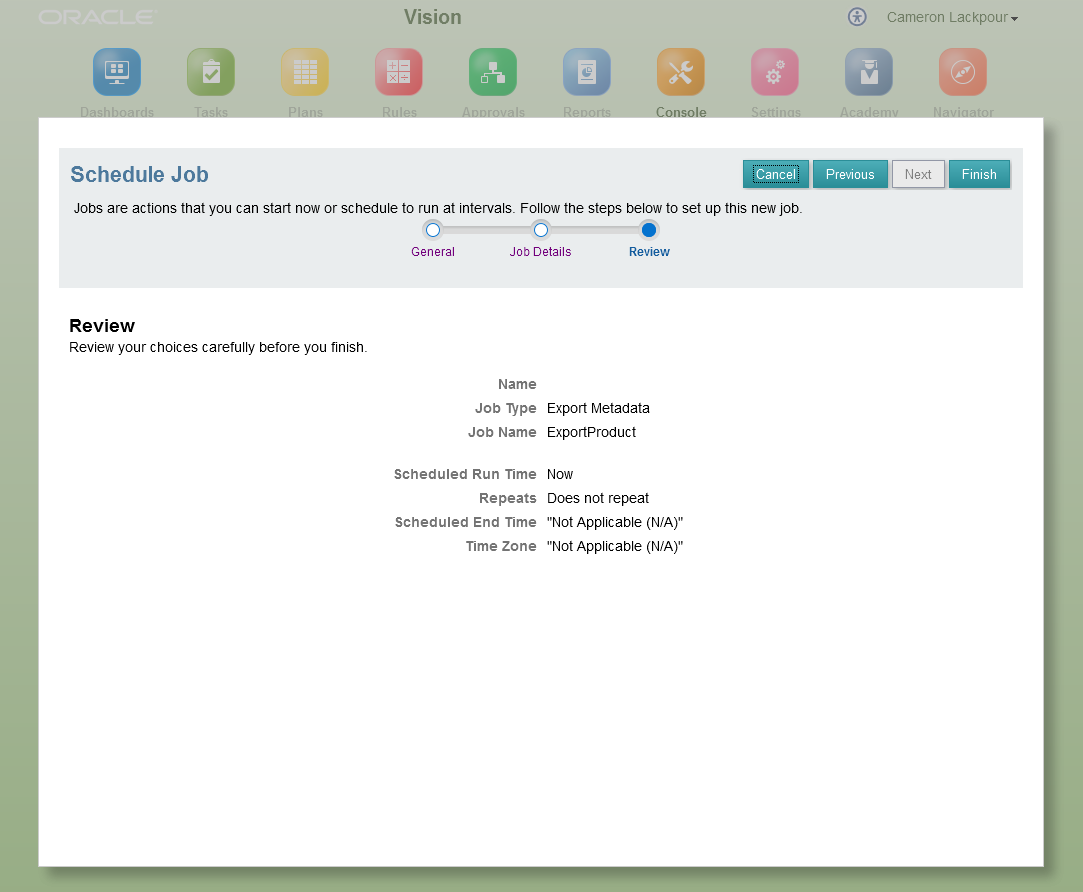
One last check to see if this is really and truly something I want to do:
There’s my job:

I can check the status:
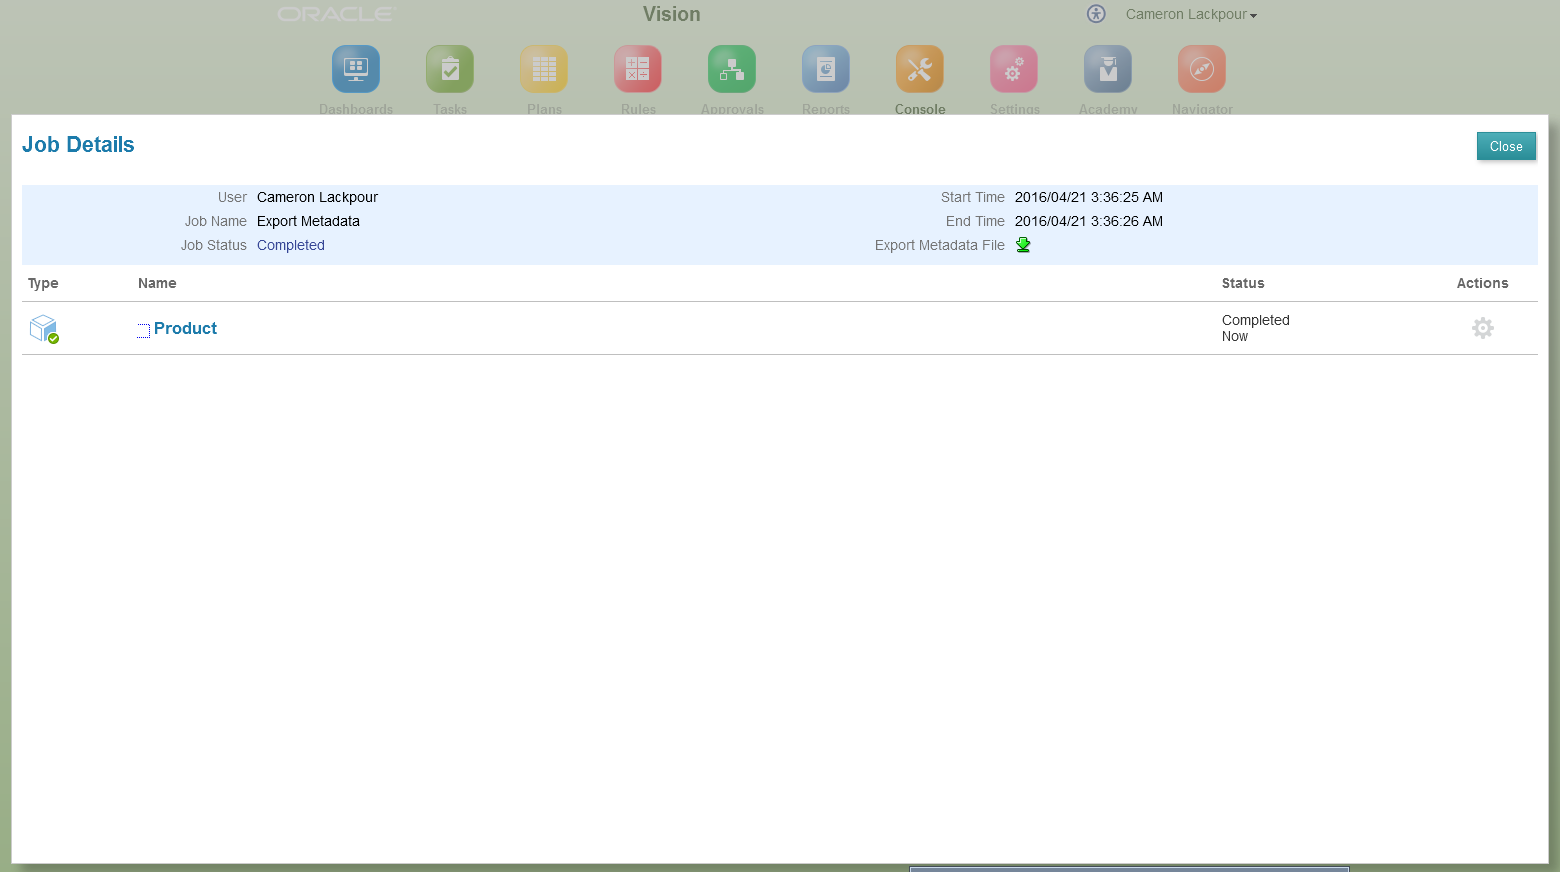
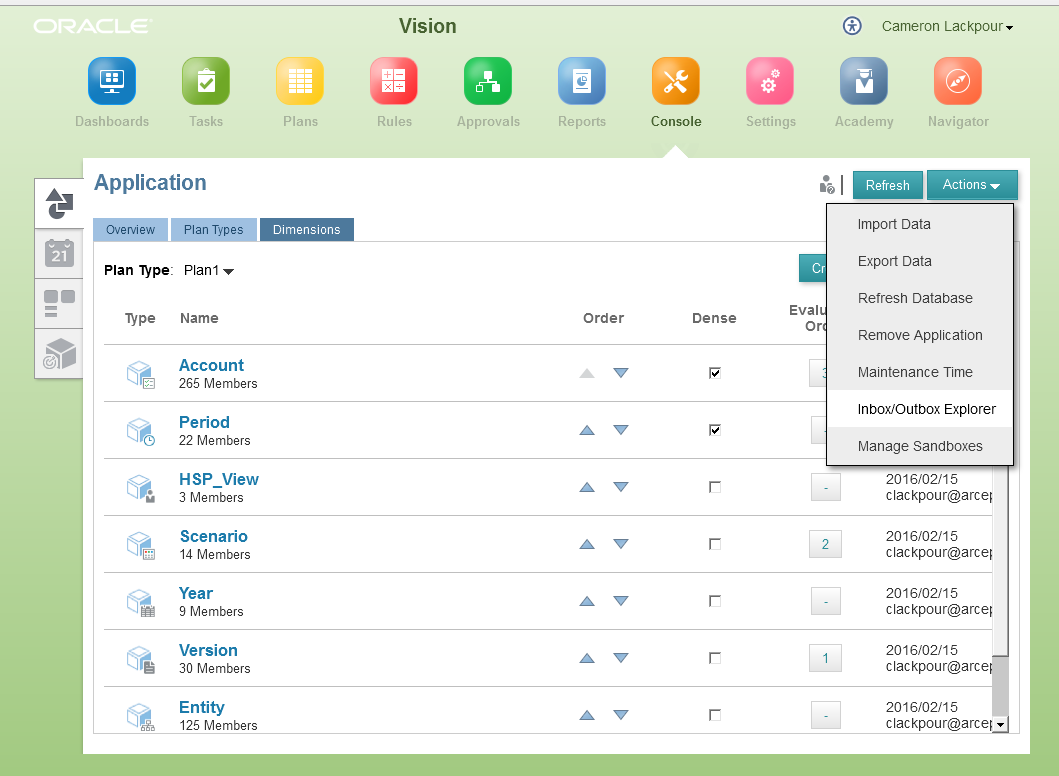
And then go look in the Inbox/Outbox Explorer – that’s where the dimension export will have been written to:
Download the file:
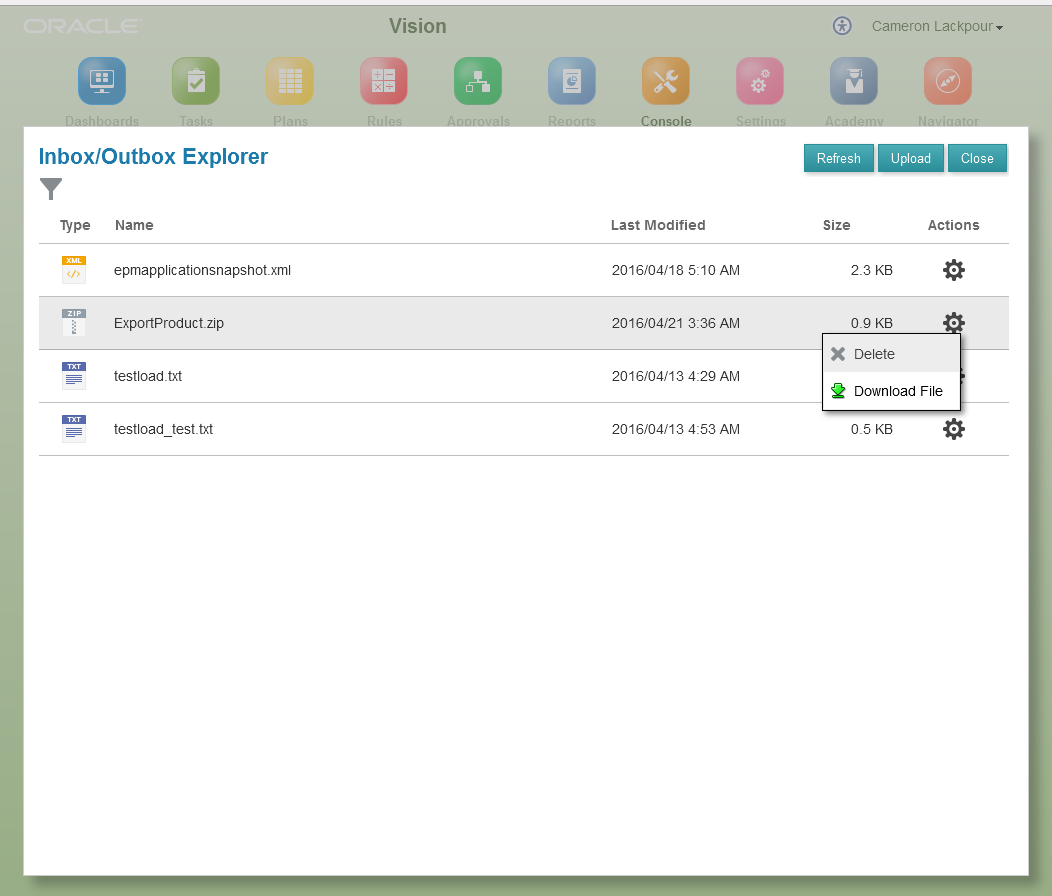
Finally, here we are:

Importing metadata
Good grief that was painful (and long – we’re at page 20 in Word). It is pretty much the same story on the way back in. I’m not going to walk you through all of the painful detail – I’ll give you a taste but the Workspace/Local/Job concepts are the same.
Here’s the import file:
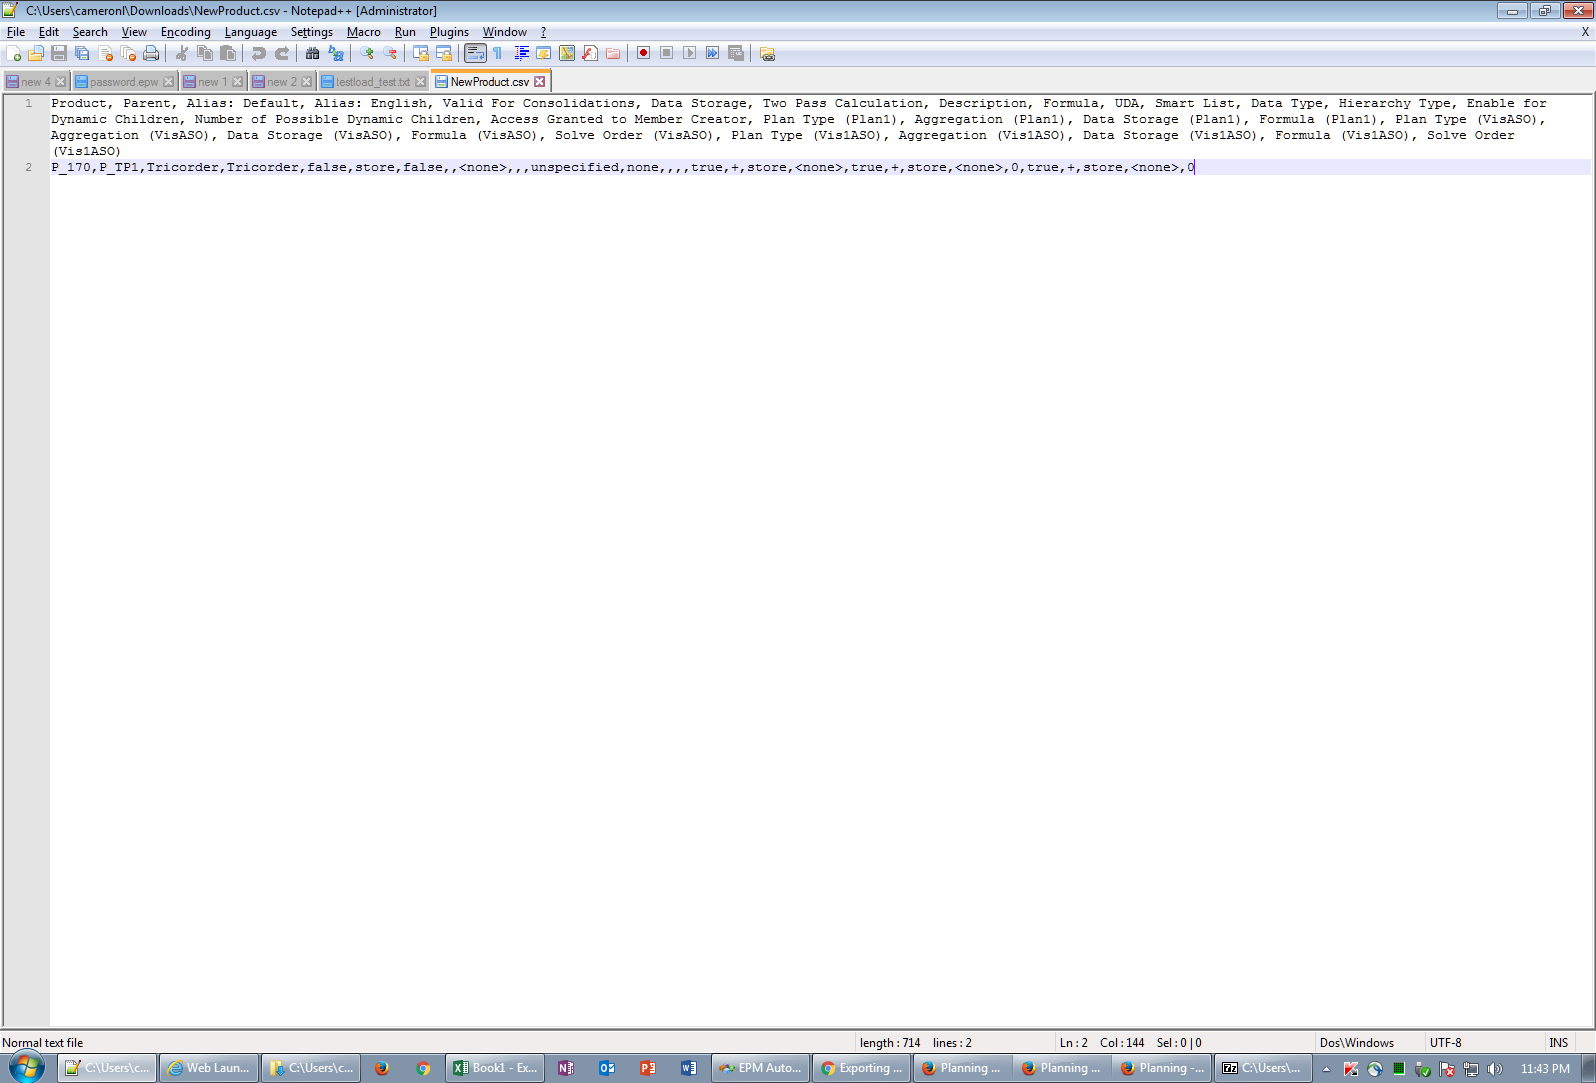
That’s hard to read, so here’s the almost-easier-to-read text word-wrapped many times:
Product, Parent, Alias: Default, Alias: English, Valid For Consolidations, Data Storage, Two Pass Calculation, Description, Formula, UDA, Smart List, Data Type, Hierarchy Type, Enable for Dynamic Children, Number of Possible Dynamic Children, Access Granted to Member Creator, Plan Type (Plan1), Aggregation (Plan1), Data Storage (Plan1), Formula (Plan1), Plan Type (VisASO), Aggregation (VisASO), Data Storage (VisASO), Formula (VisASO), Solve Order (VisASO), Plan Type (Vis1ASO), Aggregation (Vis1ASO), Data Storage (Vis1ASO), Formula (Vis1ASO), Solve Order (Vis1ASO)
P_170,P_TP1,Tricorder,Tricorder,false,store,false,,<none>,,,unspecified,none,,,,true,+,store,<none>,true,+,store,<none>,0,true,+,store,<none>,0
What could possibly not be clear about that file format?
At least it’s easy to see the Tricorder.
Workspace
It’s the same simple task it was in exporting only the other way round. Yeah, I know, duh, but it really is simple.

Pick the file:

Click on Update to make it all happen:

And there it is:

‘Cos I am a compleatist (groan) I will show the last few steps.
Kick off the refresh:
Do I want to do it? Yes I do.
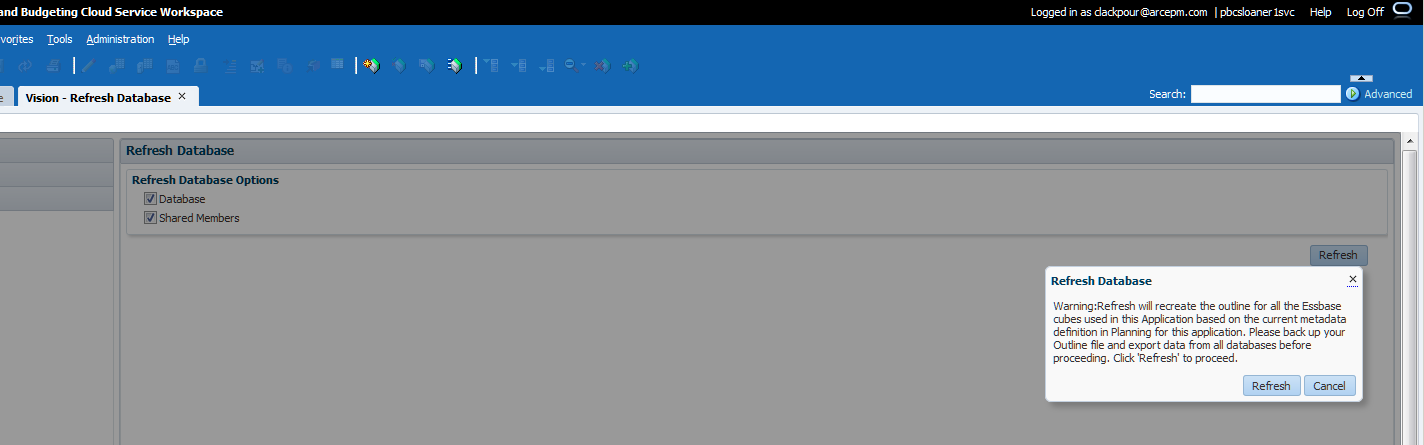
And I did.

Simplified Interface
Local
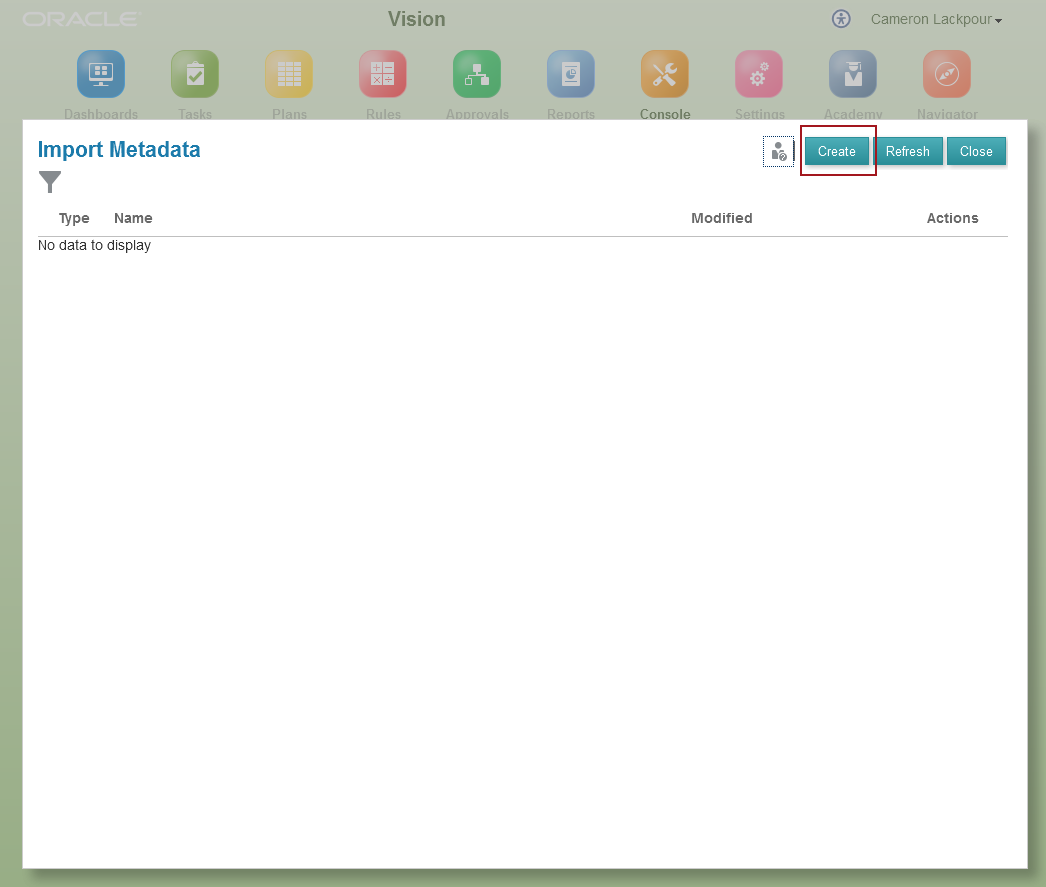
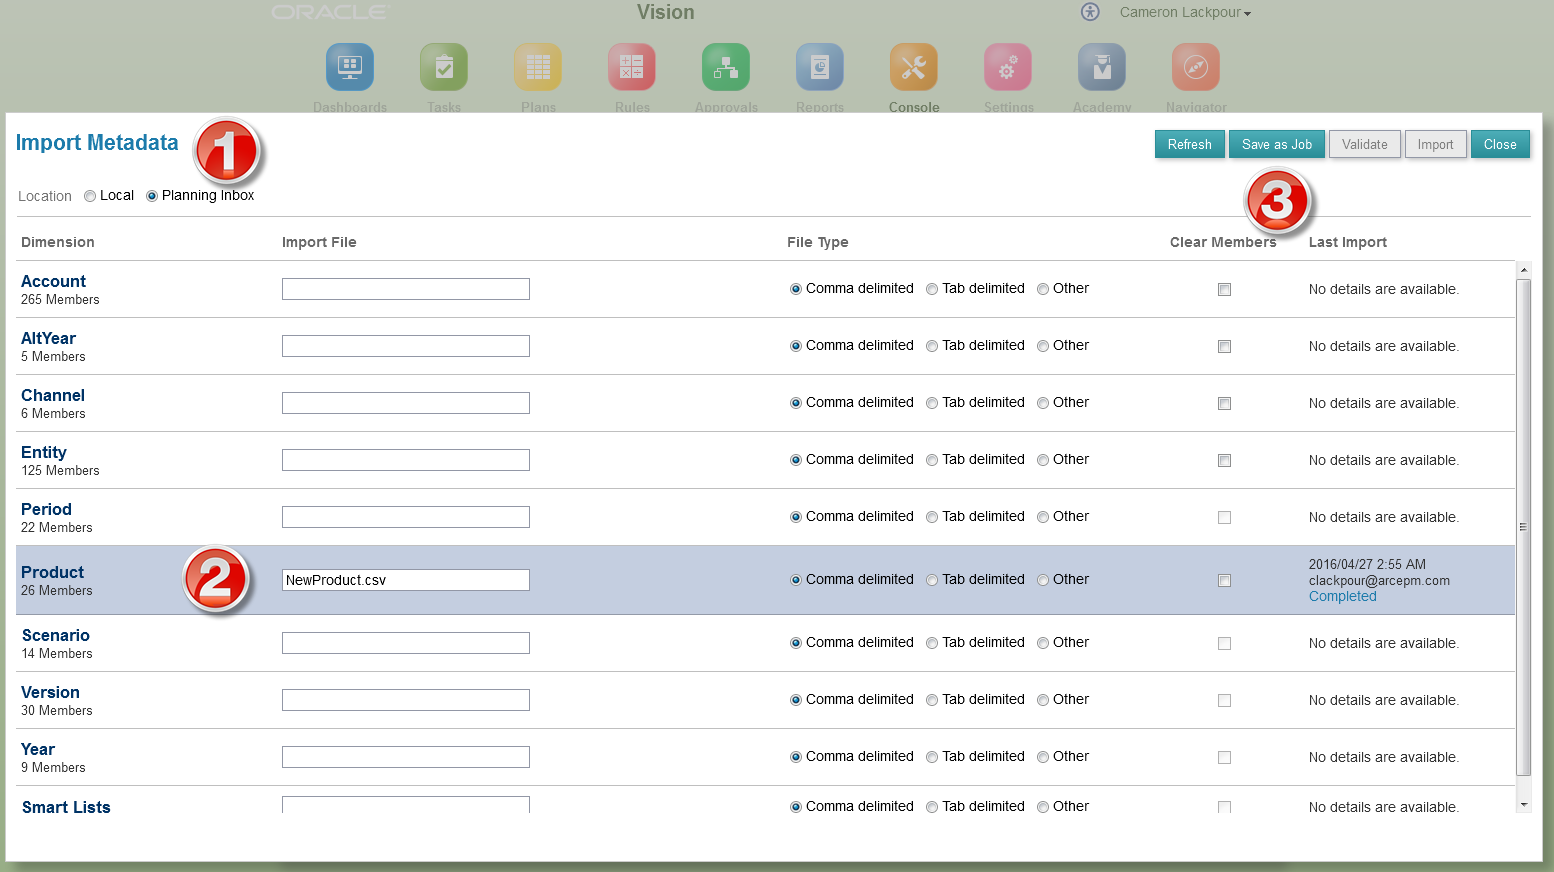
Back to the Console/Application tab, then Dimensions, and then click on Import:
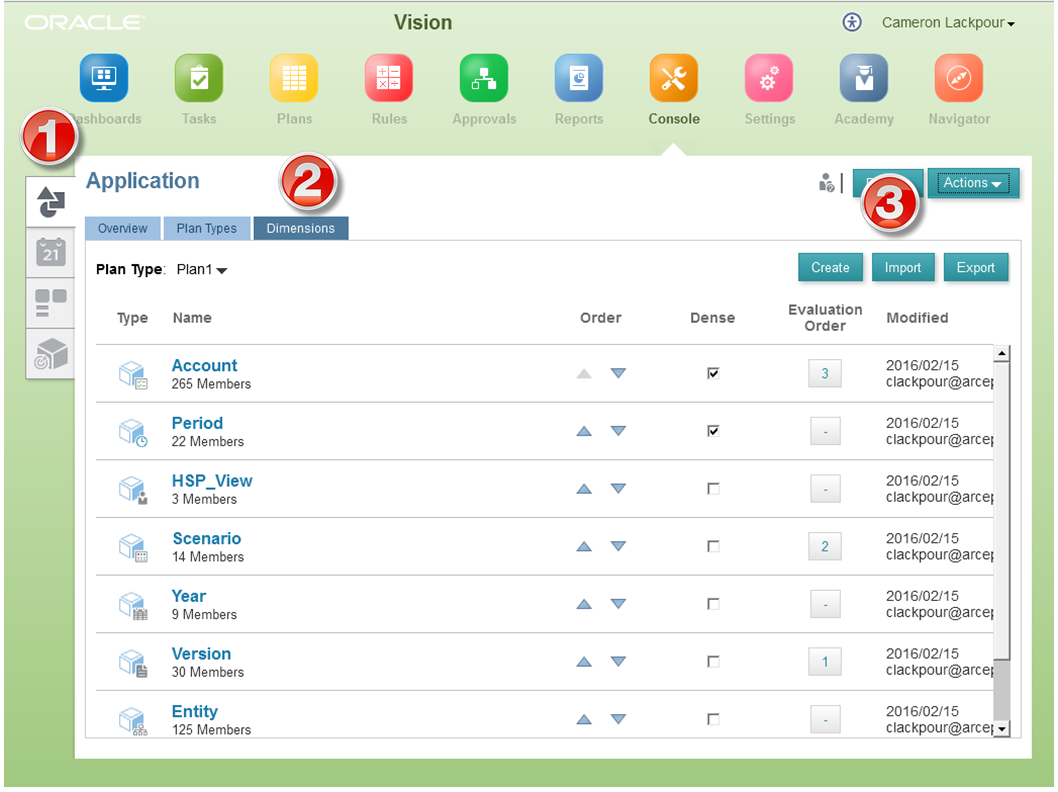
Click on Create
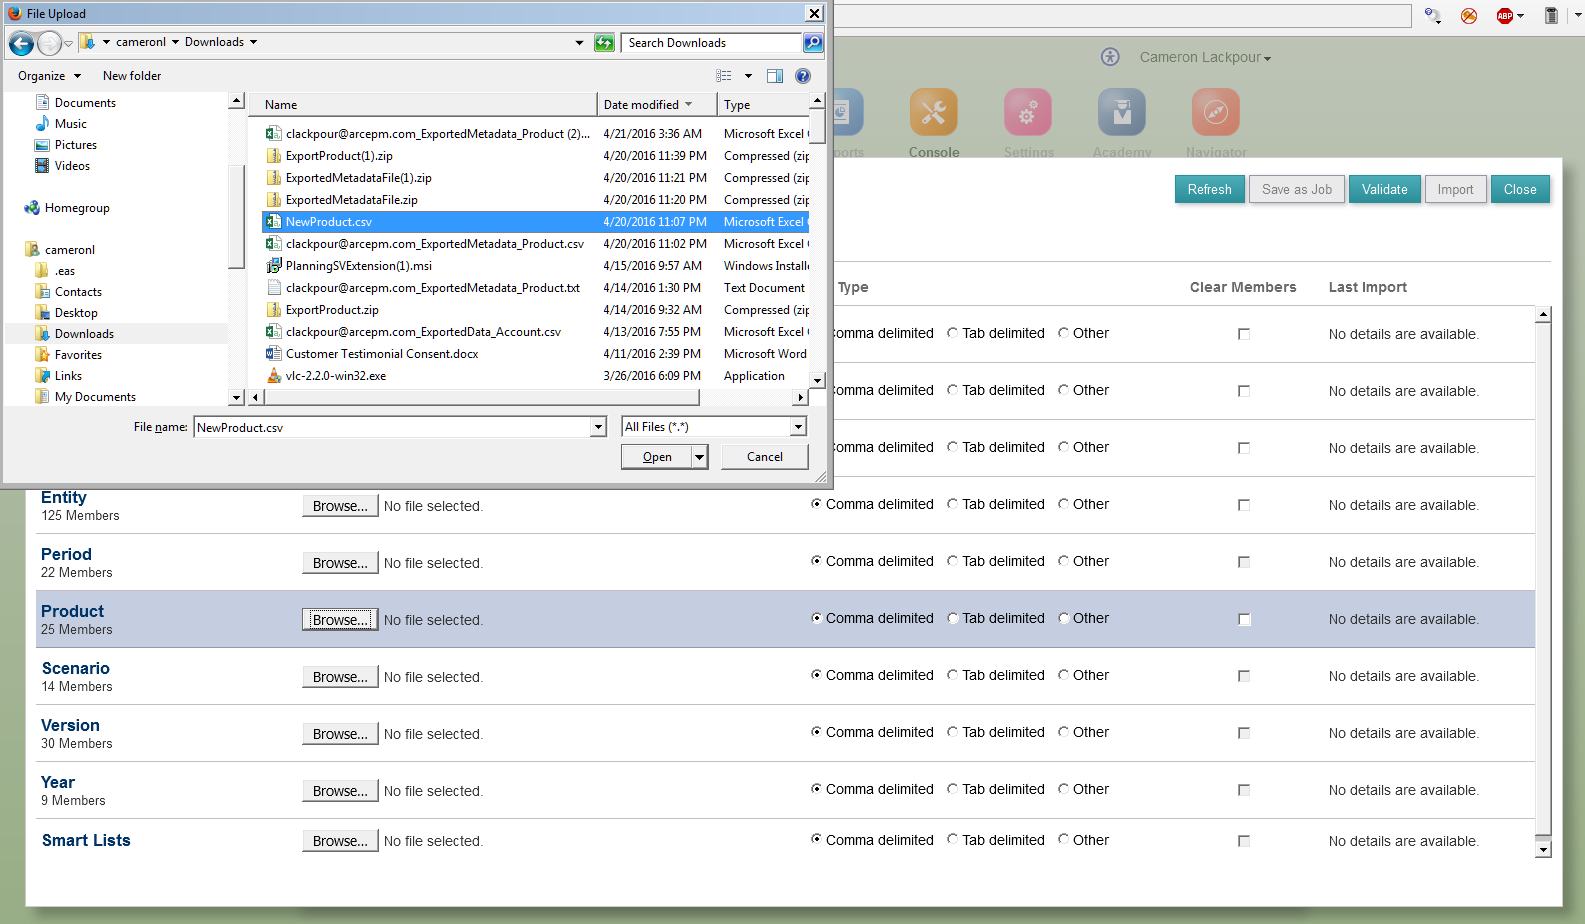
Then on the dimension itself and then browse for the file:
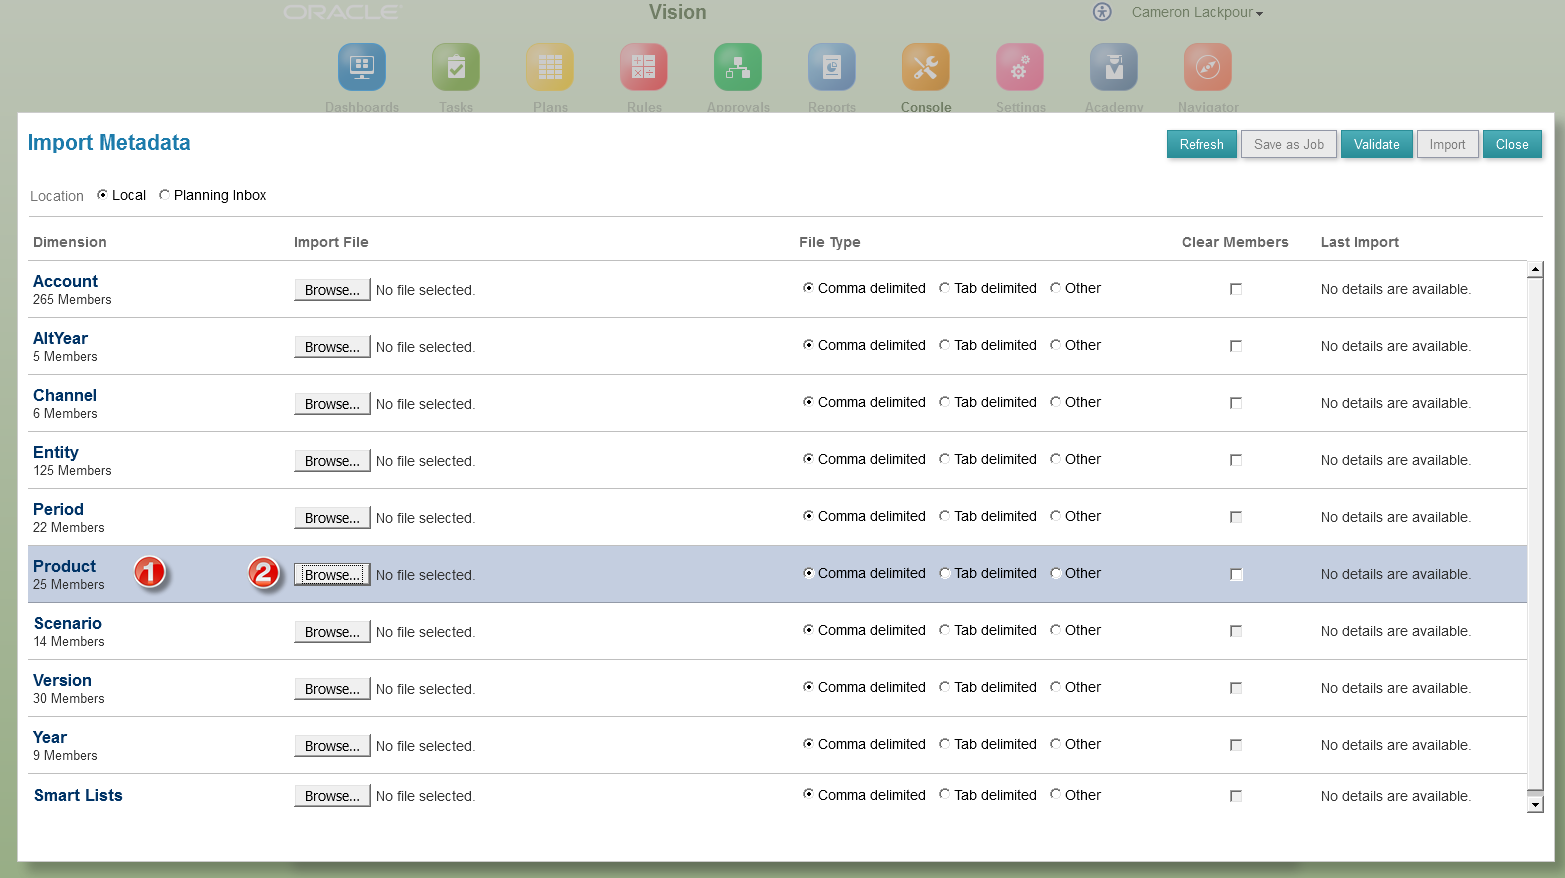
Note that I am importing a .csv file, not a zip file:
Then click on Import.
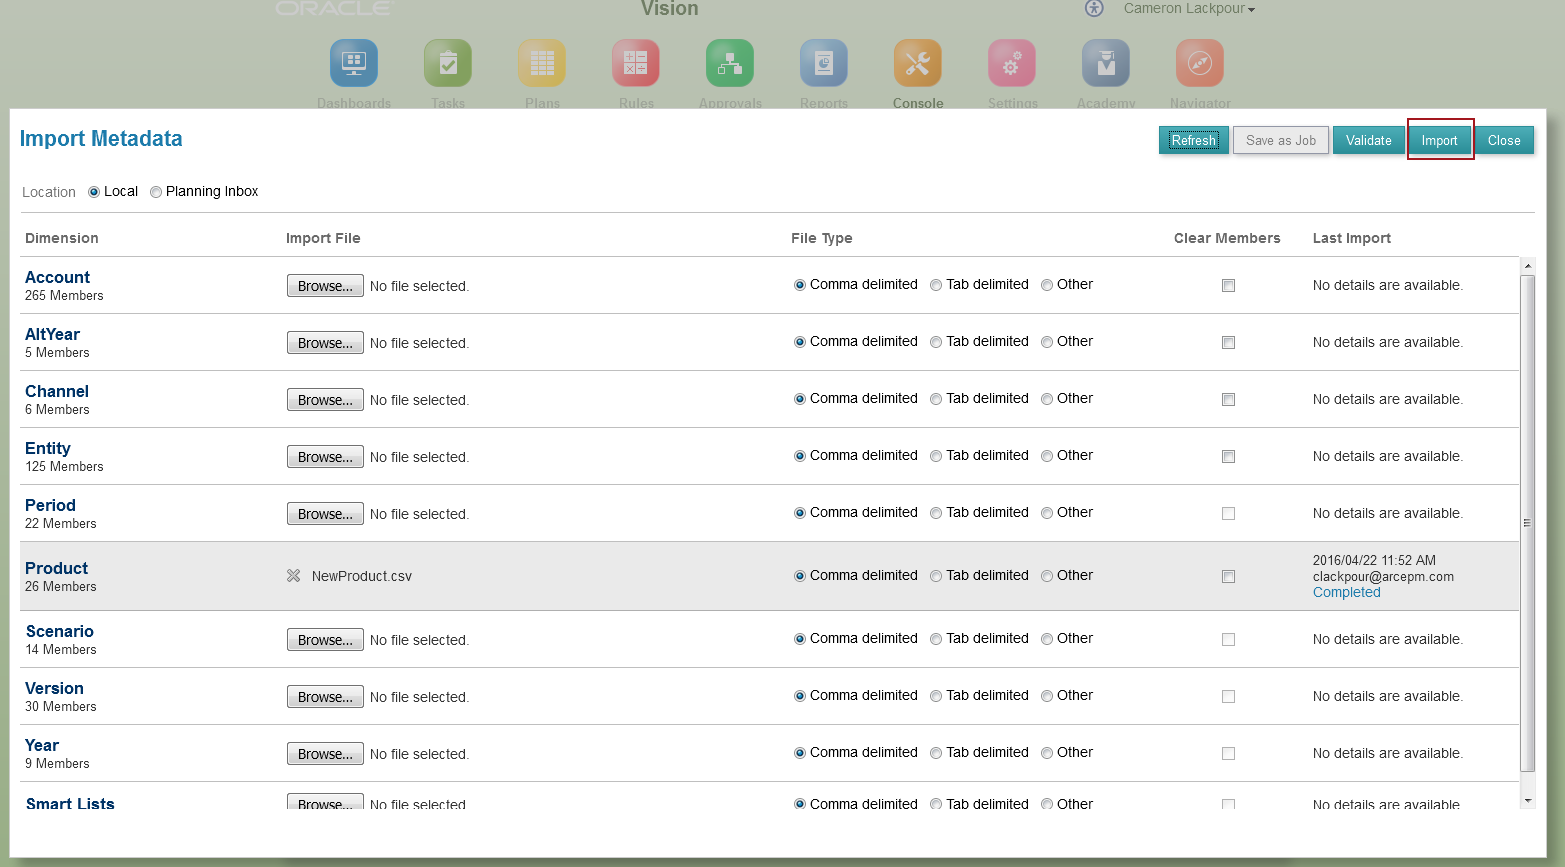
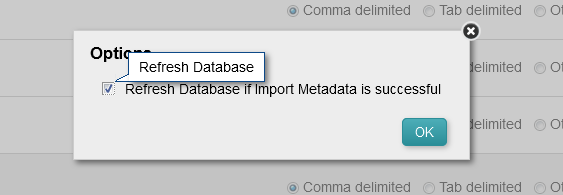
Clicking on Import gives me the choice of refreshing the application or not. I vote Refresh.
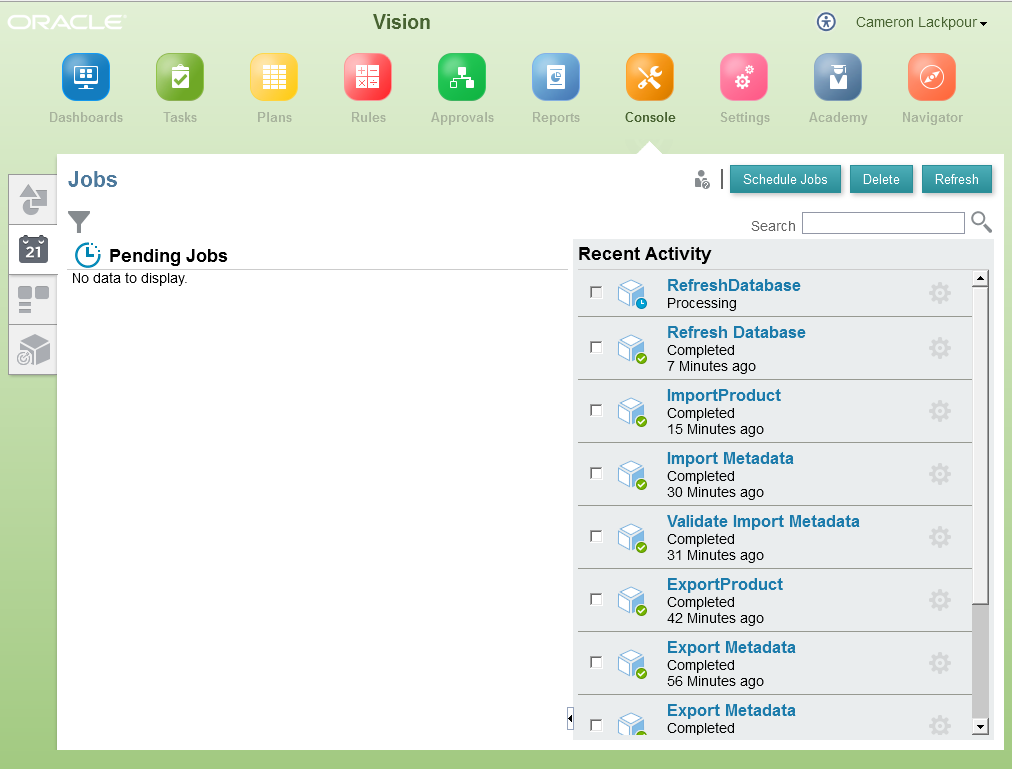
Did it refresh? All that I know is that the metadata job was submitted. So did the refresh happen or not?

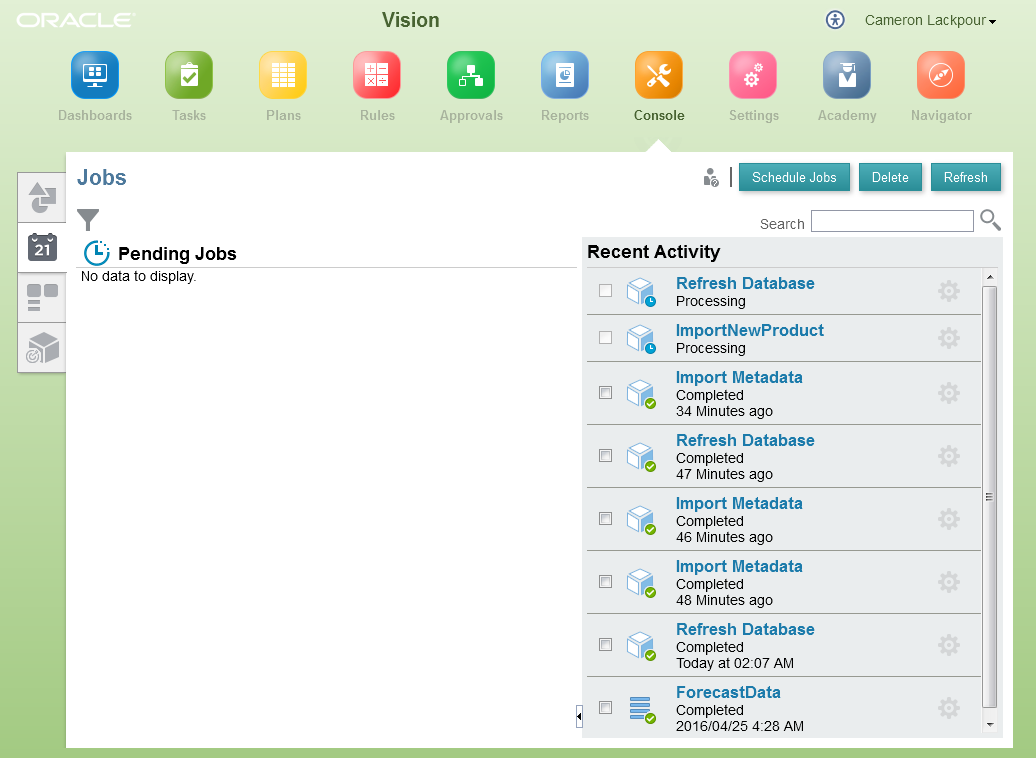
If I go to Jobs and look at the activity pane, I see that indeed the refresh has happened.

And there’s my Tricorder. Spock, eat your heart out.
Explicitly with a job
This time I’m going to explicitly move this file to the Planning Inbox.
Pretend that I’ve shown you how to navigate to the Console, click on Dimensions, Import, and Create.
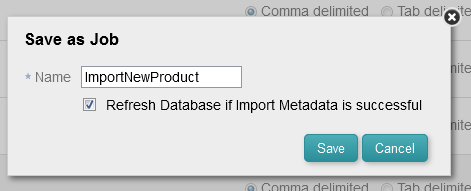
To get this into the Inbox/Outbox, click on Planning InBox, provide the file name (no browsing via Windows Explorer), and then Save as Job.
I again have the choice of refreshing the application or not but this isn’t an immediate act. Instead, I am tying the refresh to the job ImportNewProduct.
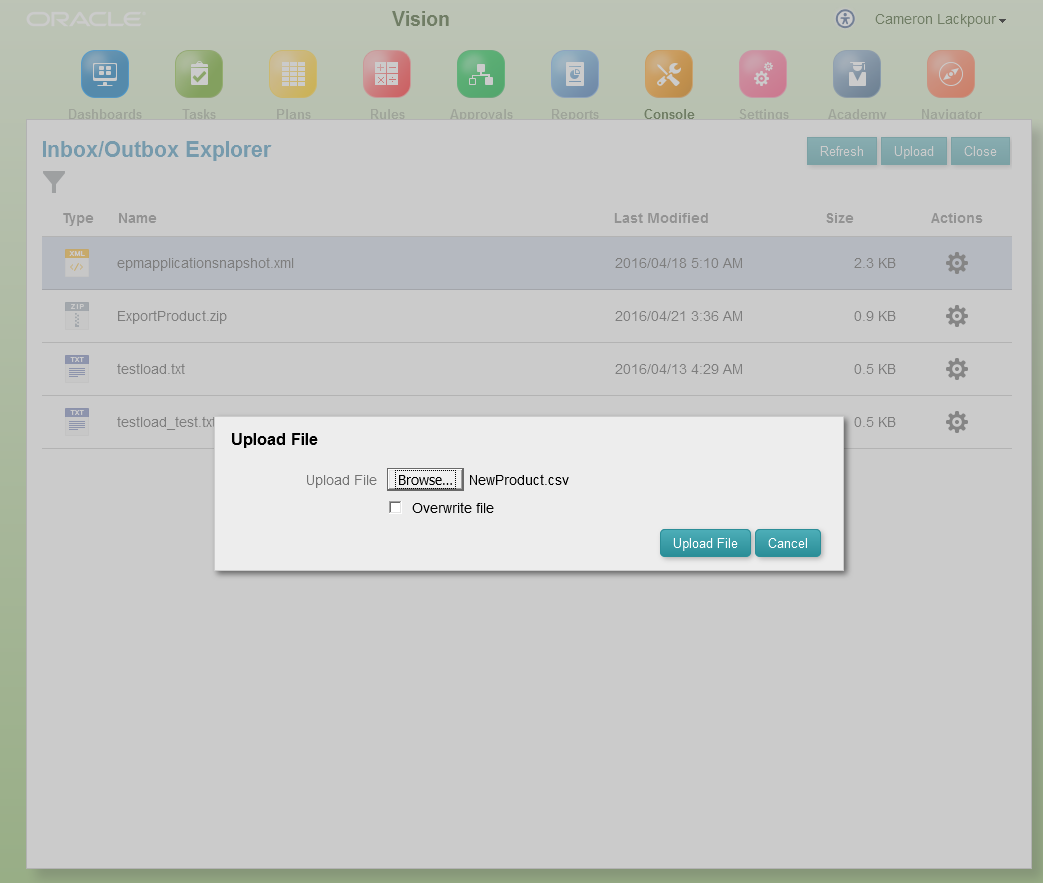
Yes, I have defined a job, but no, the actual file hasn’t been uploaded to PBCS. To do that, go back to the Application tab and then select Inbox/Outbox Explorer.

Once inside, click on the job and then Upload.

Browse to the file.

Upload it.
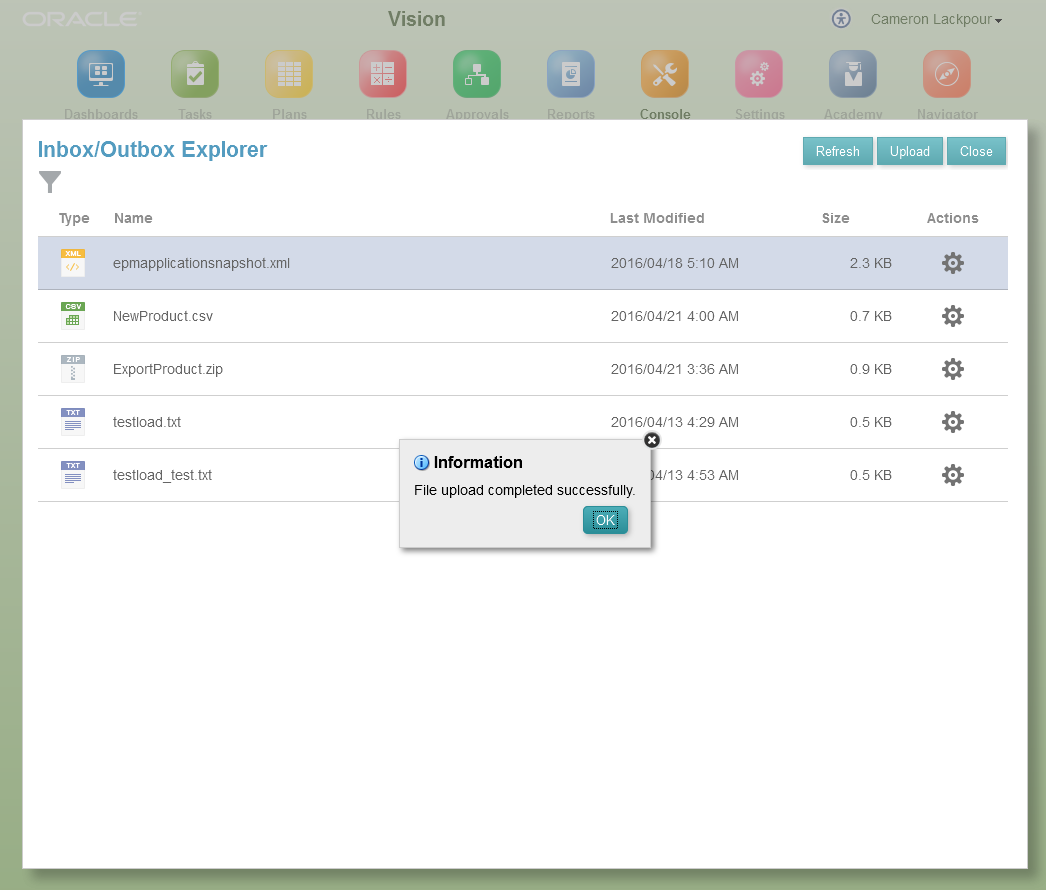
You’ve managed to do it.
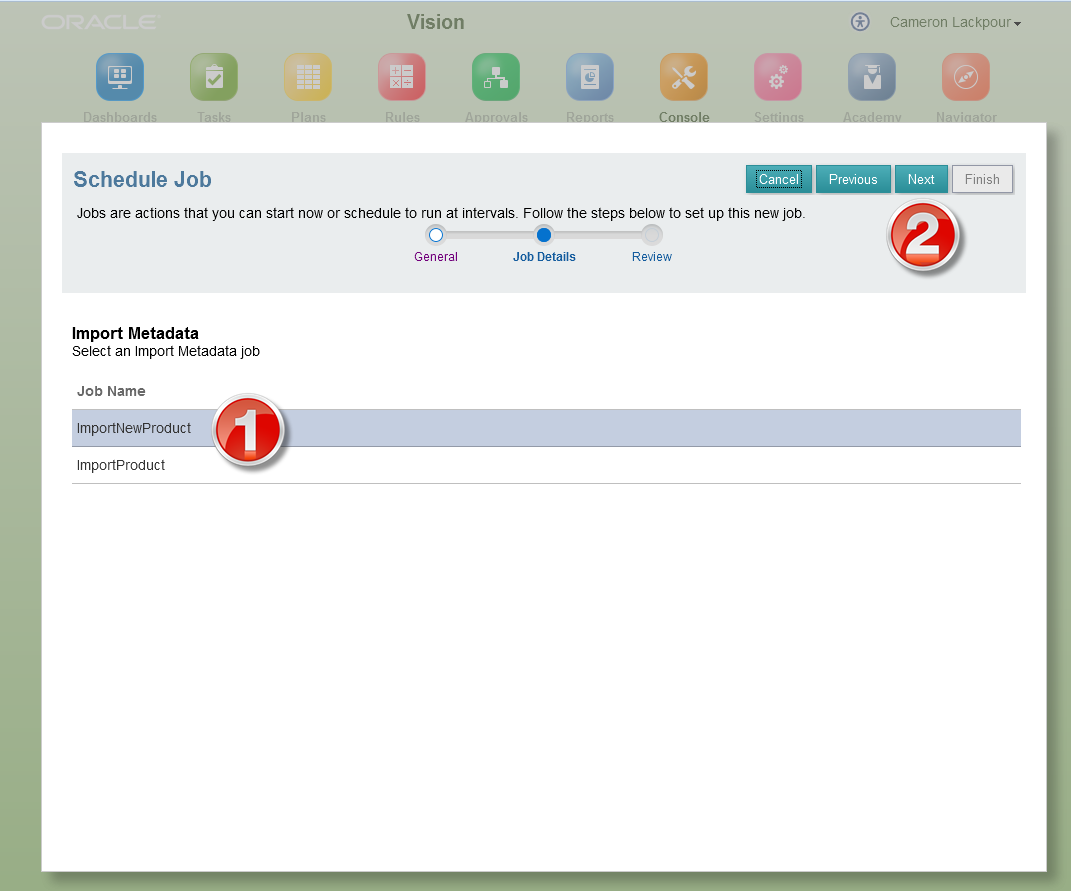
Let’s take stock: we have an import metadata job, a file loaded to the Inbox tied to that job, and so now need to run that import. To do so, go back to the Console and select the Jobs tab, then click on Schedule Jobs.

Pick the job type and run it right now.

Pick the just created ImportNewProduct job and then click Next.
Click on Finish and the job will run.
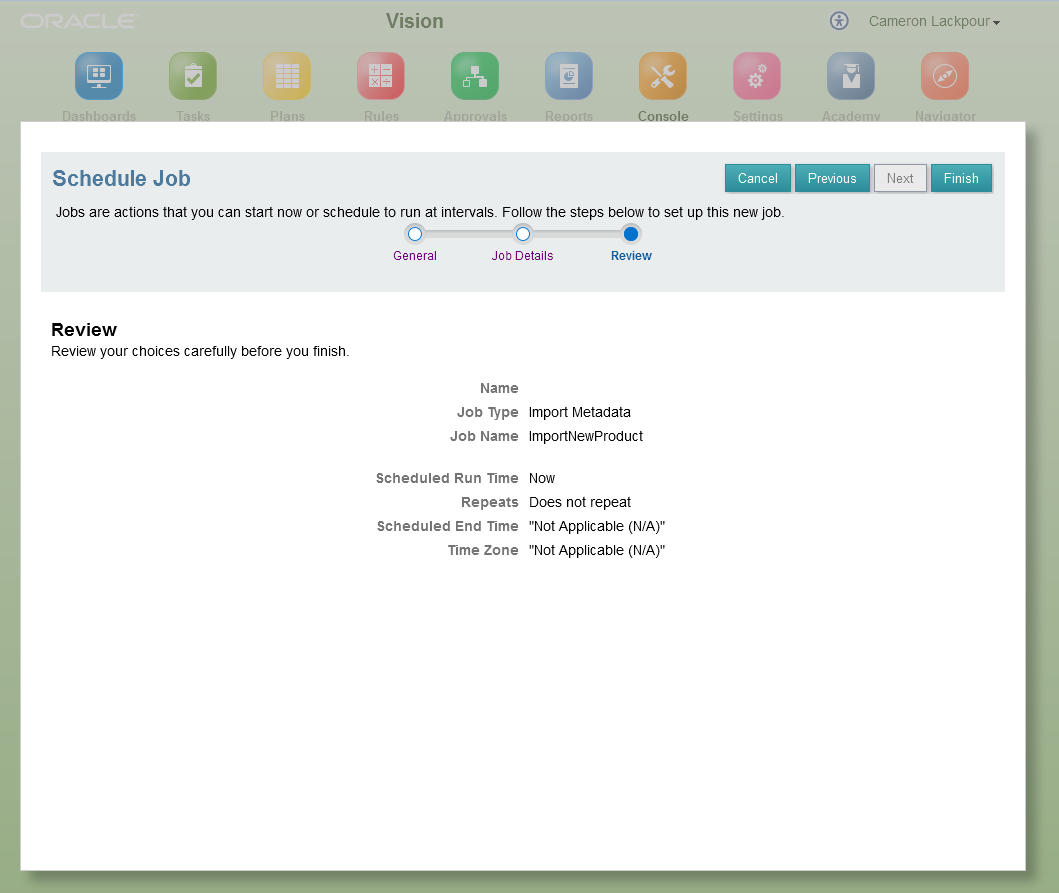
As can be seen, both the load and the refresh are happening.
And it’s done.

Import without Refresh
To define the Refresh as a separate act (remember how multiple dimensions can be defined and loaded in a single job?), I’ll not tick the box “Refresh Database” when I create the job.
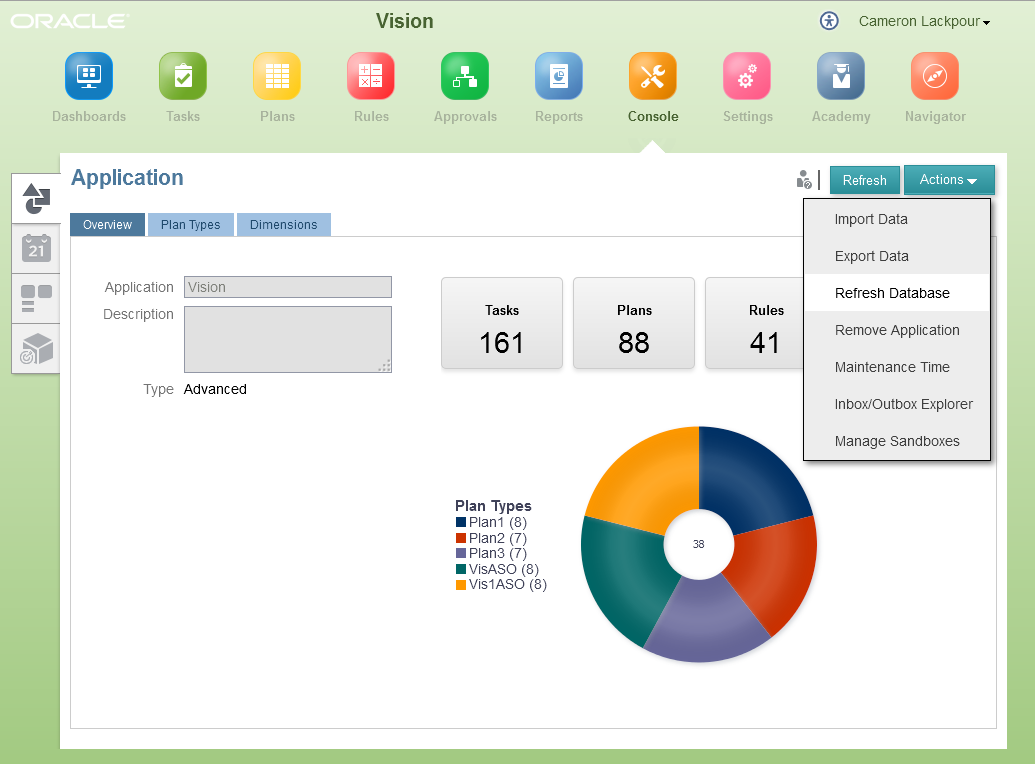
Again, going back to the Console, select the Refresh Database selection from the Actions dropdown.
Yup, you’ll have to create a job. Once again, there is the choice of instant gratification or defining this as a job. Note the options for performing a refresh. Would that on-premises Planning had these options for managing users.
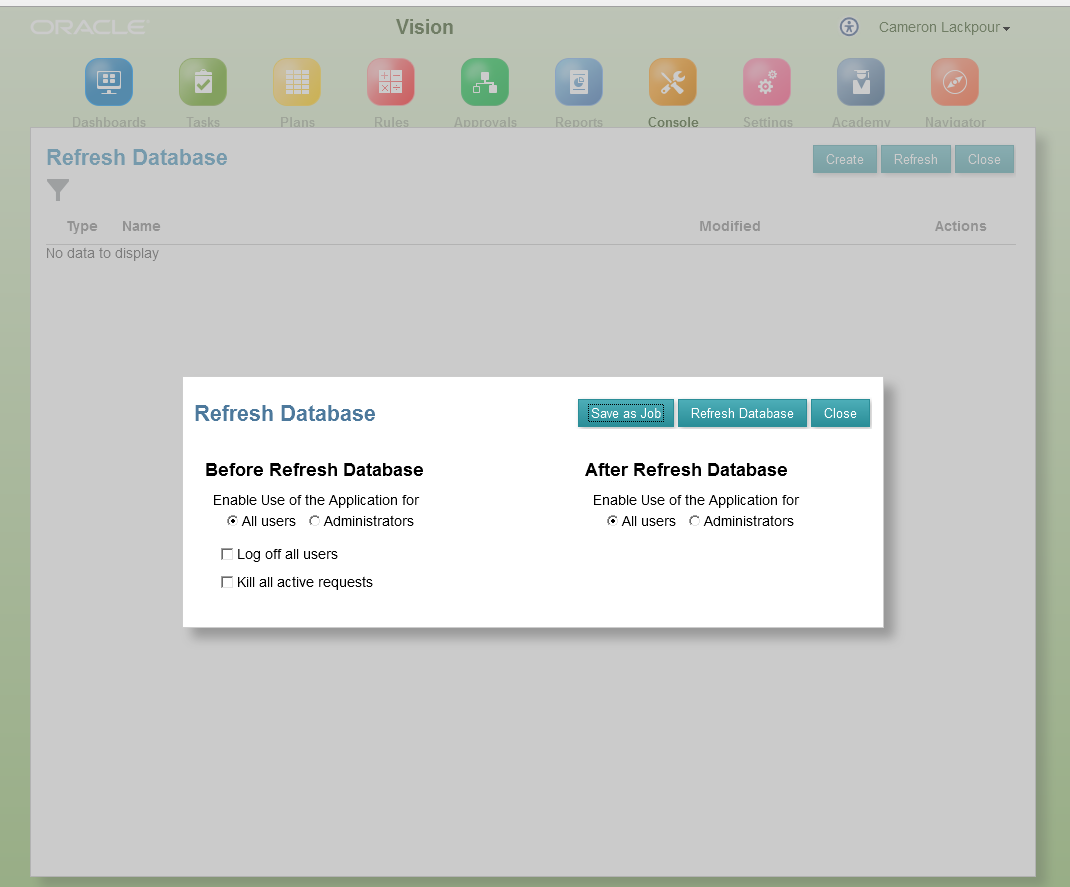
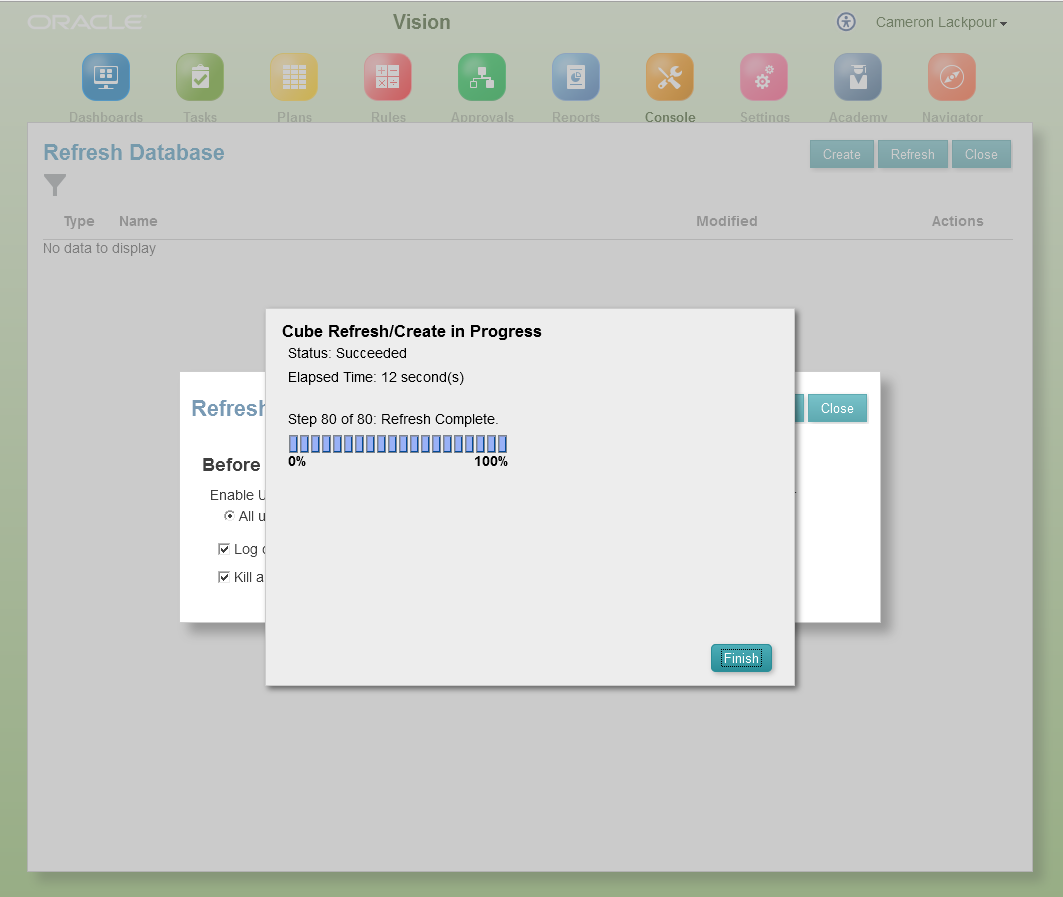
Let’s do it right now.

The refresh is ongoing.
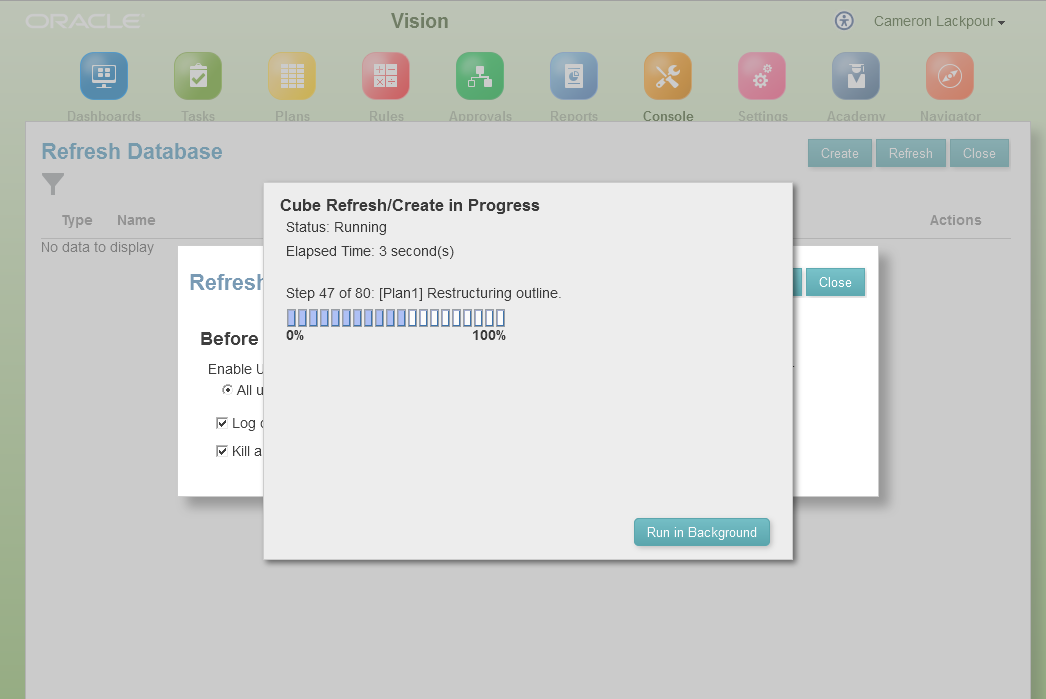
And done.
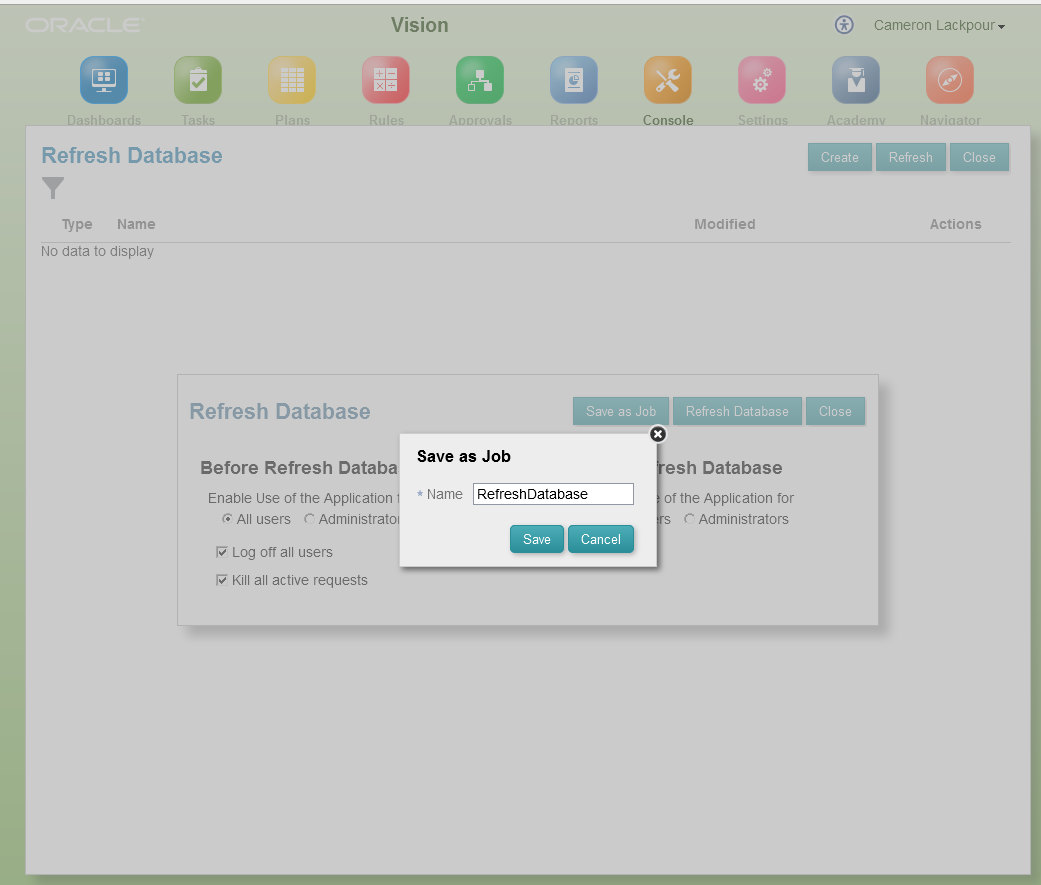
But what of the alternative of going all the way with this as a job? Click on that Save as Job button and name it.
And then run it.
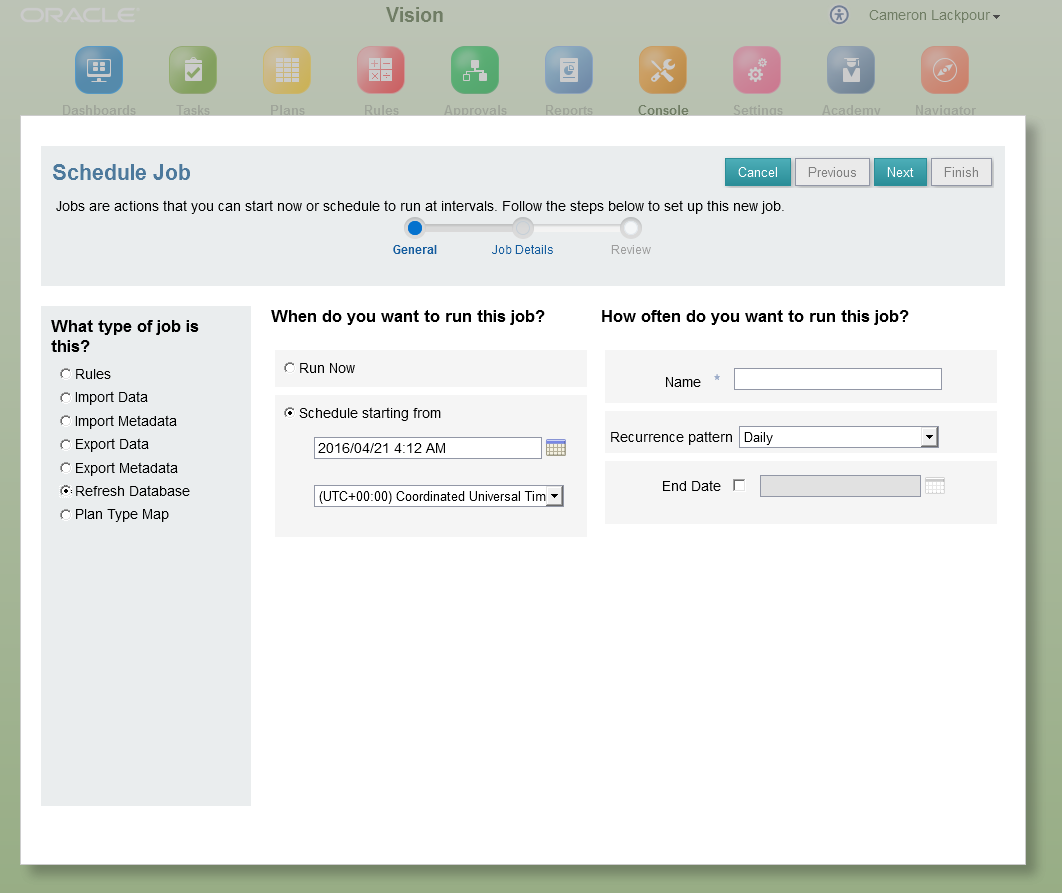
Right now.
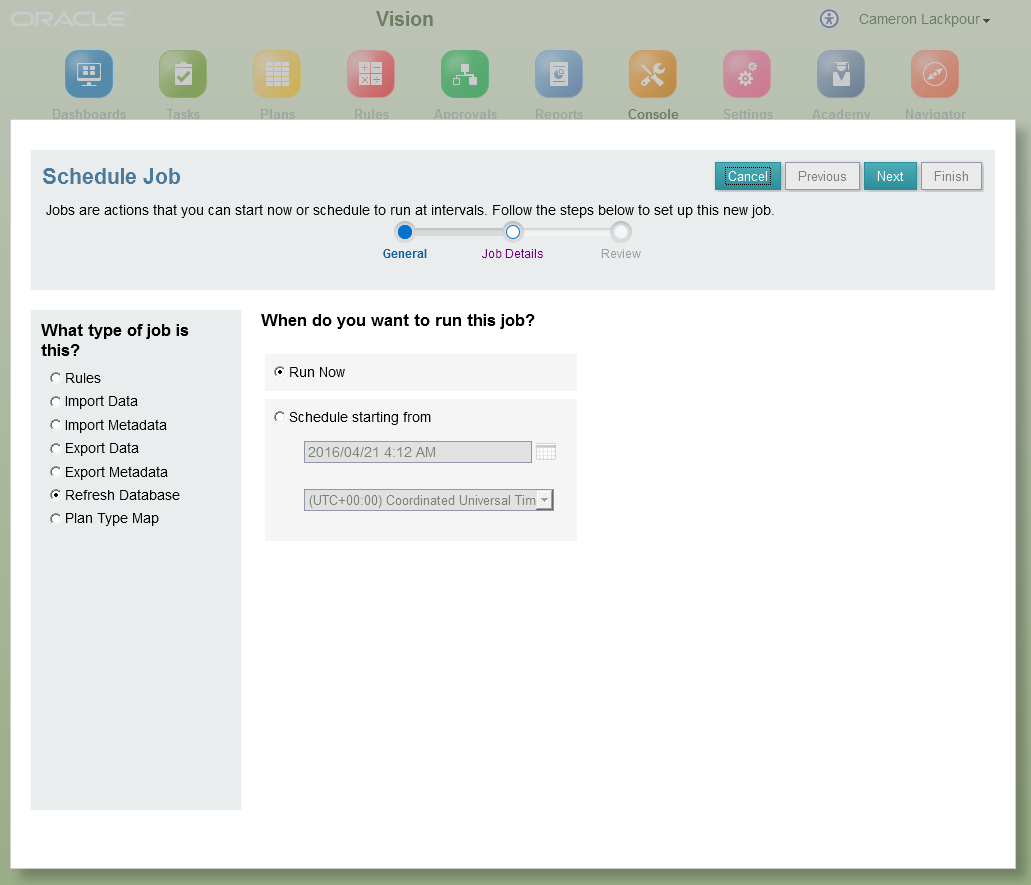
Yup, we go through the wizard again.
And again.

Check again.
It’s done.

For giggles, let’s go see the dimensionality in Smart View as I am getting a bit punch drunk (I’ll bet you are too) with the SI.
Yippee! We have a Tricorder of our own.

Still here?
You’re a brave one for persevering through all 55 pages of screenshots. This is the longest post I’ve ever written and I hope to never do write one as long again. Amen.
But this pain has brought home a couple of things when it comes to the steps an administrator has to go through to perform common steps. Btw, steps, clicks, stares of despair at yet another screen all mean approximately the same thing here. As I noted up above, this is a long post and I’m tired. So sue me.
Let me count the ways
Dimension export
- PBCS’ (and on-premises) single dimension export took five steps.
- PBCS’ Simplified Interface, local edition, took four steps.
- Using PBCS’s job approach, we’re approximately at 22 steps. ←I could be wrongish on that as it’s late and all of this is a bit of a blur but the number is close.
Dimension import
- PBCS’ and on-premises’ Workspace dimension import took six steps.
- PBCS’ local approach took 11 steps.
- PBCS’ job approach with a refresh tacked on took 22 steps.
Database refresh
- PBCS’ and on-premises’ Refresh database is four steps.
- PBCS’s Simplified Interface run-it-right-now process is four steps.
- PBCS’s job approach is seven steps.
Counting the cost
If we do the math, we’ll see that to export, import, and then refresh takes:
- Workspace – 15 steps
- PBCS’ local approach – 19 steps
- PBCS’ job approach – 51 steps
51 steps vs. 19 or 15. Who would go down the path of jobs and why?
What’s next
You thought we were done? No such luck, I’m afraid. Per the steps written lo so many days ago at the tippy-top of this post, we still have to tackle clearing data, loading data, and then aggregating. Happily, the business rules side of things is much easier although alas the import of data still has the same multiple path approach. It’ll be long but not nearly so much as this post.
Be seeing you.